The Subway Zion Hiking Guide
The Subway hike in Zion National Park is a fantastic adventure. It’s one of the best hikes in the park. But it’s not an easy trek; it is a backcountry, off-trail route. You will need a Zion wilderness permit and prepare yourself a little bit because it’s a long, 9-mile round trip in rough terrain. Most of this time, you will walk in the cold stream, crossing it from one riverbank to another. How to get a Subway permit? How to prepare for The Subway Zion Hike? What gear to take? We share our experiences in this detailed Subway Zion Hiking Guide.
This article may contain affiliate / compensated links. For full information, please see our disclaimer here.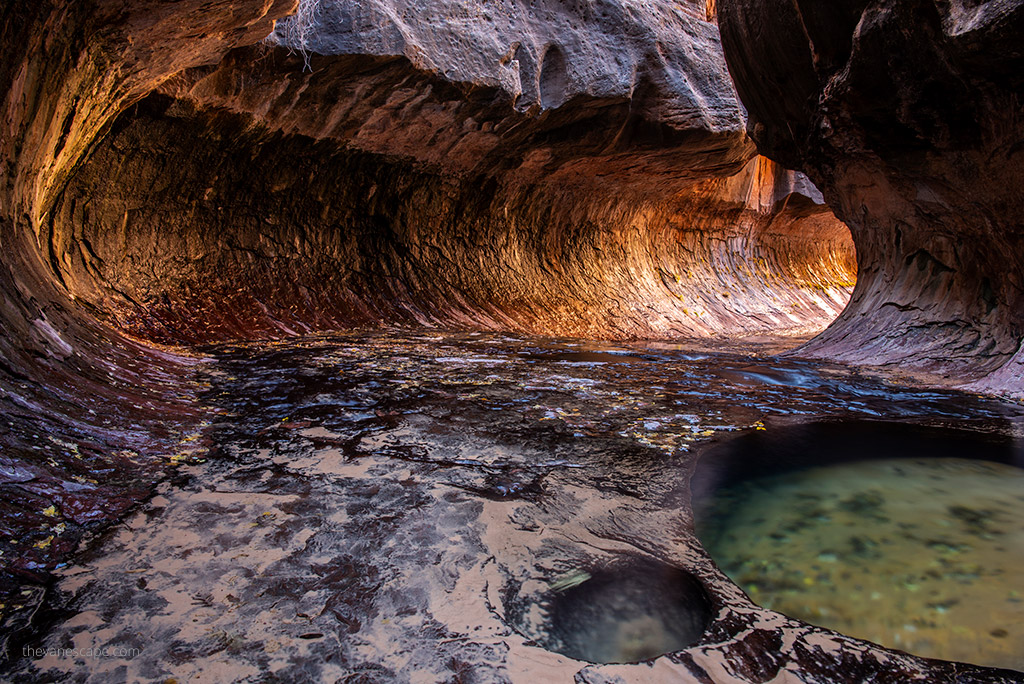
What is The Subway in Zion?
The Subway is a small, uniquely shaped tube-like tunnel slot canyon within the Zion Wilderness in Zion National Park in Utah.
It’s a short canyon of fewer than 0.25 miles (0.40 km), but it is stunning. The Left Fork North Creek flows through The Subway and the Great West Canyon. This article describes The Subway Zion Bottom-Up hiking route (known as Left Fork), which is perfect for all photography-passionate and experienced hikers.
We love this hike. My partner Chris and I have done it twice so far, and we share our experiences, insights, and photos from this adventure. It’s a backcountry adventure through remote terrain. It requires navigation skills and a long hike out. We give you a lot of tips on how to prepare for it.
But if you are looking for another best hike in Zion, lodging recommendations in Zion, or advice on preparing for your trip to Zion National Park, check out our article about Zion National Park.
The best place to stay overnight before the Subway hike is in Springdale, one of the best adventurous towns in Southern Utah. Book your accommodation in advance.
Preparing for a hike to Subway is most noteworthy. So, check our list of 13 essentials of any hike before you hit this trail. Also, make sure to check out our detailed Day Hiking Packing List to prepare for this adventure.
PRO TIP: Are you planning the Utah road trip? Check out our detailed Utah National Parks itinerary!
The Subway Zion Bottom-Up Hike Basic Info & Map
Level/Rating of the Subway Hike
It is a strenuous all-day hike, 9 miles out and back, that starts by descending a steep slope to the bottom of the Canyon. The terrain is tough, and there is no marked trail. The Subway hike includes a trek in a cold river that is crossed many times. The water is full of slippery rocks, trees, and other obstacles.
It’s tricky to navigate sections of wet rock formations from one riverside to another riverside alternately.
So you need a day to do this hike and start early in the morning. Also, be prepared to get wet. Most of all, do not do this canyon if there is a threat of rain.
Is a Permit Required for the hike to the Subway?
Yes, the Subway Zion Hikes requires a wilderness permit. All hikes through the Left Fork/Subway require a permit. Detailed info is below.
Elevation Gain in Subway Hike
It is a steep 400-foot descent from the trailhead to the bottom of the canyon.
Hiking Distance – Time Required & Length of the Subway hike
You should have at least 7-10 hours. The hike is 9.0 miles round-way, but it’s strenuous, and there is no marked trail. Start it early because it’s a challenging trail, and losing the path is easy.
The Subway Hike – Trailhead Location
Left Fork Trailhead is roughly 8.2 miles up the Kolob Terrace Road from the town of Virgin. Mileage Driving time from Springdale is 45 minutes.
The best seasons for hiking the Subway in Zion
What is the best time to hike the Subway Zion? From late spring through fall, although spring runoff in April and May might make hiking much more difficult, even dangerous. So, ask about current conditions at the Wilderness Desk in the Visitor Centre in Zion.
The best colors are during autumn, so we highly recommend October – November for the Subway hike. The trek is also possible in winter, but you need a drysuit/wetsuit or other adequate icy water protection. So, check our gear recommendations below. The most important is your safety. First of all, check the weather, the flow rate, the water level, and the flash flood potential before you go.
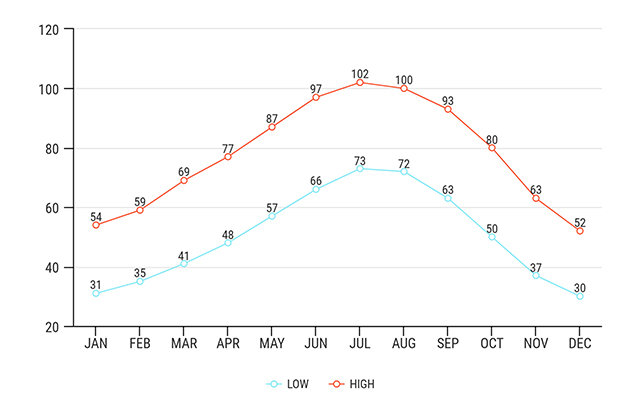
Average temperatures in Zion
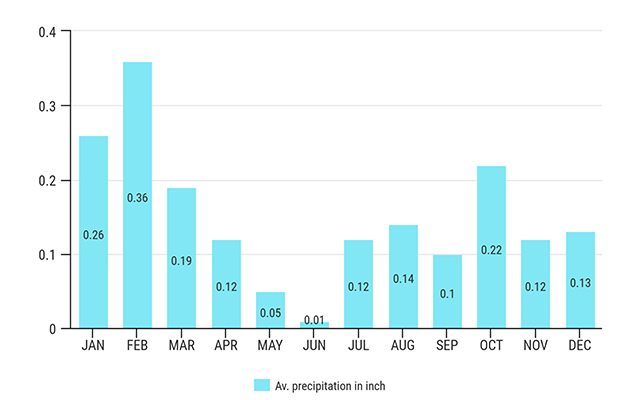
Average precipitation in inch
The Subway Zion Trail Features
The Subway is unique, like an underground tunnel rock formation. The trek offers spectacular views of the Canyon through the river; it’s breathtaking wilderness, one of the best in Zion National Park. Most of all, the hike provides plenty of opportunities for photography.
Options & Permits for Hiking The Subway
The Subway has two ways to explore. Permits are obligatory for both of them. Both treks involve extensive route finding; there is no marked trail. The Subway is a one-day hike only.
Overnight is prohibited, so the best idea is to start the Subway hike just after sunrise. Both trailheads are located on Kolob Terrace Road.
Hiking the Subway from the Bottom Up (Hiking Route)
It is a strenuous 9-mile round-trip hike through the Left Fork of North Creek that requires route finding, creek crossing, and scrambling over boulders. This hike begins and ends at the Left Fork Trailhead on Kolob Terrace Road. In this article, we focus on and share our experience on this hike because we made it twice.
Hiking the Subway from the Top Down (Canyoneering Route)
It is a strenuous, semi-technical 9.5-mile trek that requires rappelling skills, 60 feet of rope, and extensive route-finding experience. The route also requires swimming through several deep pools of icy, debris-filled water. The trail begins at the Wildcat Canyon Trailhead and ends at the Left Fork Trailhead.
We didn’t make this trail, as we are photographers, and our goal was to take great pictures of the Subway. So, if you need more info, you can check it on this canyoneering website.
Permit for The Subway Hike – online application
Due to the popularity of the Subway hike in Utah, the NPS created an online lottery for reservations. You will find detailed information on the NPS website. The number of permits is limited to 80 people a day only. Hiking The Wave Formation is another exciting place in the area for which you need a permit.
The Seasonal Lottery for Subway Hike: 4 Months in Advance
An online Seasonal Lottery is held for all trips, all year, into the Left Fork of North Creek (Subway) to obtain a reservation for a Wilderness permit. Seasonal Lottery applications are completed online.
Your entries have to be submitted 4 months before your planned trip. So, for a trip in April, May, or June, you must participate in the lottery between February 1 and February 25. If you plan your trip in July, August, or September, you must participate in the lottery between May 1 – May 25. For the Subway hike in October, November, or December, you must participate in a lottery between August 1 and August 25.
The non-refundable lottery application is $6.00. Applicants will receive a notification email on the fifth day of the following month with information about the status of their request. You can apply here. You’ll have to pick up the permit in the park the day before your hike, so plan it. If you win the permit, the fee is $10 per person.
The Daily Lottery for Subway Hike: 2 Days in Advance
The daily lottery for the Subway hike in Zion National Park operates online and is for obtaining a Wilderness permit. You can apply on this website two days before your intended hike date between 12:00 am and 3:00 pm MT.
The lottery draw happens at 3:00 pm MT, and applicants are notified by 4:00 pm MT of the same day. There’s a $6 non-refundable fee for each application. This lottery is an option when Seasonal Lottery or Calendar Reservations are fully booked. Permits not claimed through the Daily or Seasonal Lottery are available as Walk-in Permits.
PRO TIP: If you fail the Subway lottery, we recommend The Narrows hike Bottom-Up, which is also perfect, and you don’t need the permit.
The Subway Zion Hiking Guide – Detailed Description
Start of The Subway Zion Hike
Start your hike early, just after sunrise. Trailhead is located on Kolob Terrace Road outside of the Zion National Park limits. The Left Fork Trailhead is several hundred feet above the Left Fork of North Creek. Follow the around 0.5-mile well-maintained path from the parking lot as it heads northeast. It’s the easiest part. After that, you will reach the cliffs.
You must go down tough and steep 400 feet without a marked trail. But the path is still visible. The descent is zigzagging down into the woods. Take great care to stay on the track as it descends steeply to the canyon floor. The trail is steep and loose. Take hiking poles and hiking boots with great traction [please, read our article on choosing and using hiking poles].
At The Canyon Bottom
This way, you reach the streambed of the Left Fork. First, look back at where you came down from. Watch carefully for all signs and remember exactly where the trail meets the water. You will be tired on the way back, and it will be late.
So, it might be challenging to recognize where you should start climbing up. Like many hikers, we also passed the exit sign and lost the path. We didn’t have a GPS back then. So, it was very hard climbing in the dark.
PRO TIP: When you get down, remember this place carefully. It’s easy to miss it on the way back. Mark this point on the GPS or GPS watch. It’s great to take it on this hike.
After orienting yourself where you will start your exit, you can hike through the canyon. You have to cross the stream and turn left. It is an off-trail route, so there is no official trail. However, there are well-established social trials.
So, if you are careful and watchful, you will notice the path along the banks. Be prepared for the wet because you will have to do some significant hiking in the stream itself. If you don’t like being wet, consider if this trail is for you.
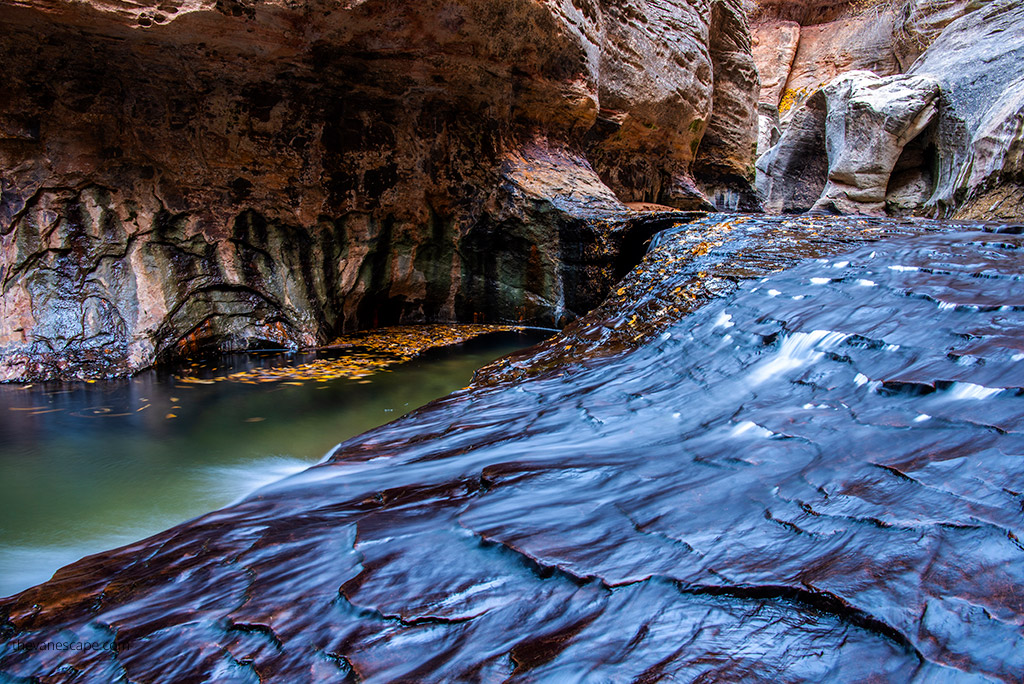
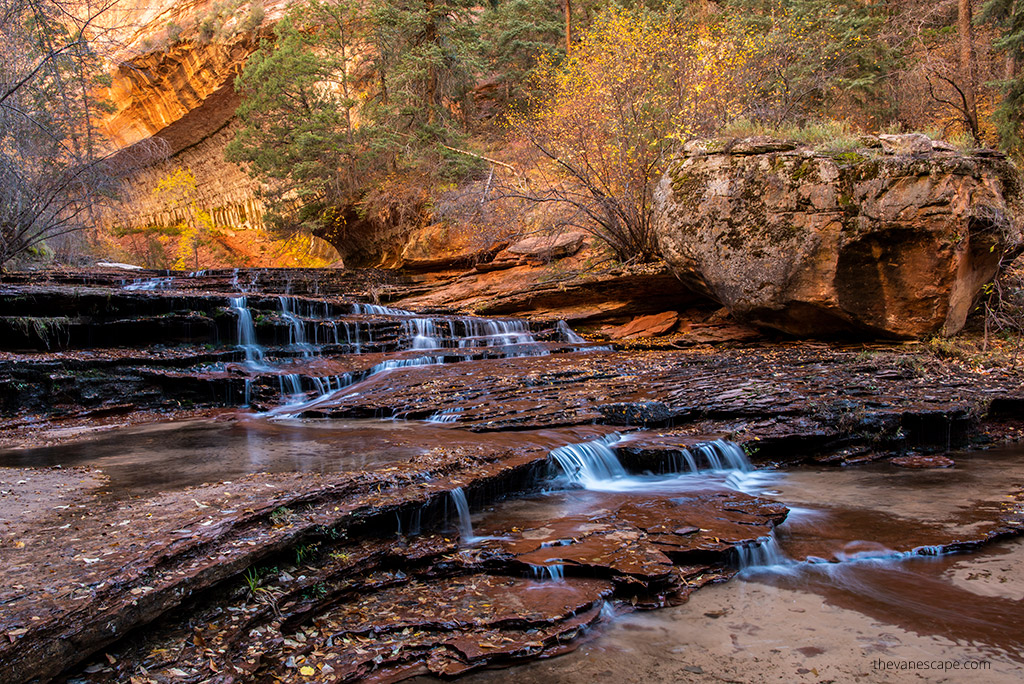
The Red Waterfalls
After two miles of hiking, the scenery starts to be stunning, but most of all, you have to watch out for your step; it’s very slippery. There will be several cascades on your way, and you will get to 15-foot tall waterfalls. It’s an excellent photography spot.
These cascades look like a grand staircase leading up to a mystery fairytale because the stream flows down dark red Kayenta sandstone slabs. But most of all, take great care as the rocks are incredibly slippery. Travel becomes slower and more difficult.
I (Agnes) was focused on the photos and slipped on the rocks in the stream. I decided to protect my camera, so I sprained her finger. So check our packing list for this hike to avoid an accident and prepare for an emergency.
Fortunately, we had a well-equipped first aid kit and extra dry clothes, so it was a hike with a happy end. Remember to pack properly, and don’t forget your travel insurance. It is essential.
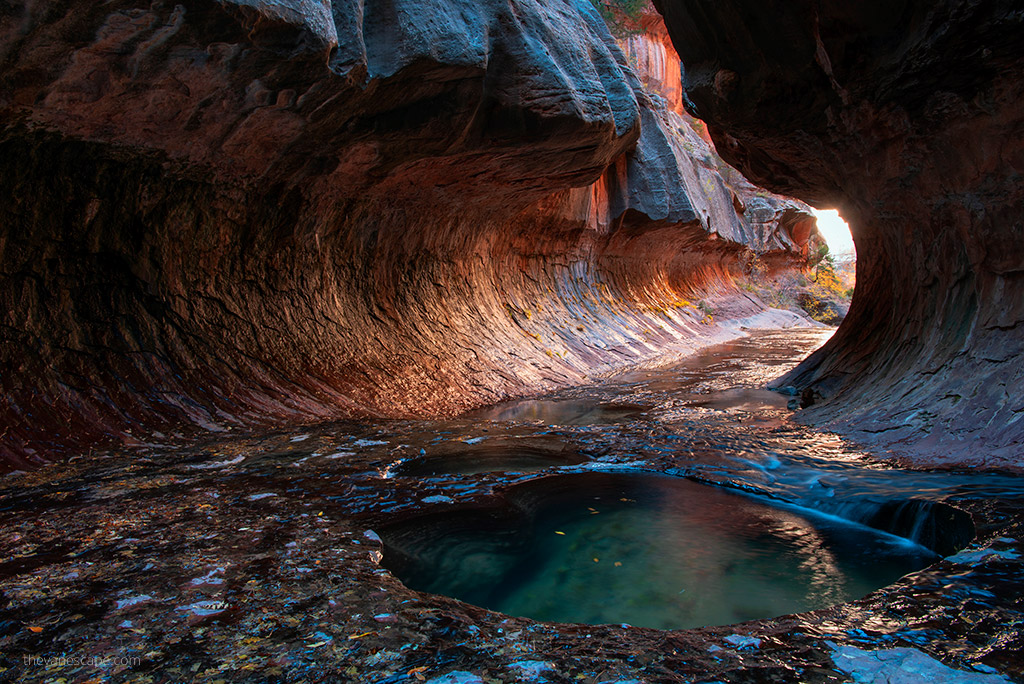
The Subway
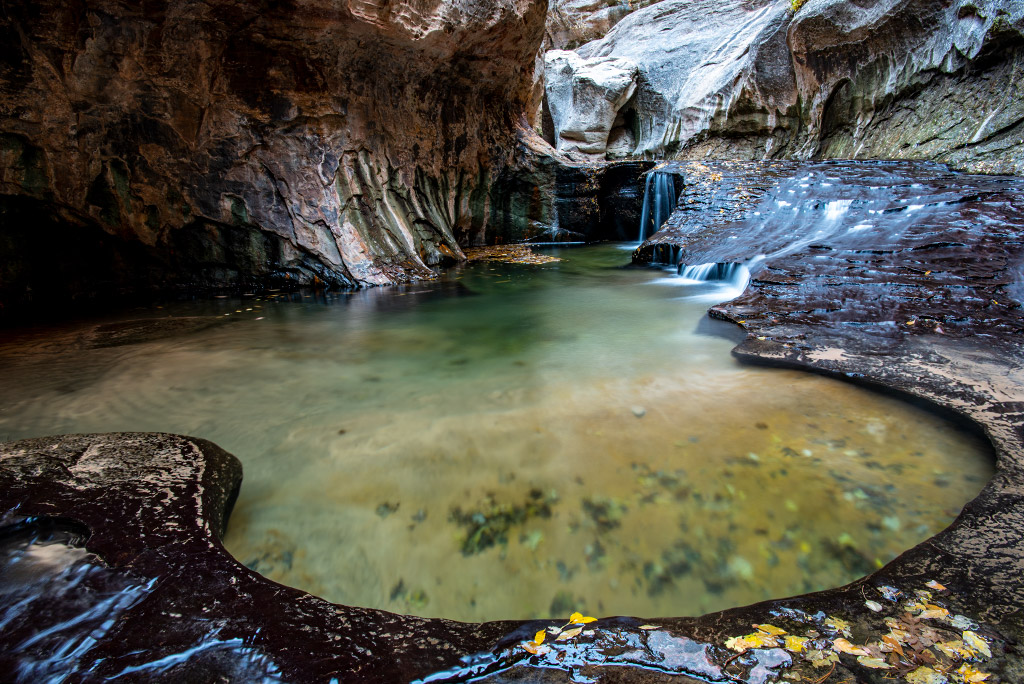
You must hike up the slabs, then turn the corner. Upstream from the second waterfall, look for the narrow crack through which most water flows. The canyon turns to the south (right), and you will see the lower Subway, a short section of the canyon where both walls come together very close, and the flowing water has cut out a larger tubular oval. It’s a spectacular view.
It looks like a railway tunnel, and you wonder when the train enters the station. It is the perfect spot to take Subway photos. The water in the pools is emerald in color, with light, warm walls, and shines on the tunnel. Ponds and waterfalls are of marvelous beauty. But watch your steps here. The rock can be very slippery.
The lower Subway is the turnaround spot for this hike. However, you can go to the pools to what’s known as the “waterfall room” to see a small 20-foot-tall waterfall. Depending on the conditions, the water may be almost waist-deep, so be prepared to get wet. Hiking poles are very useful in this wet and slippery area.
Return from the Subway
After taking photos and eating lunch, it’s time to go back. You come back the same way. But save energy for the strenuous hike uphill to return to the car. Remember that the way is long, and you will be tired, so give yourself enough time to do this.
The steep 400-foot ascent back up might be exhausting. Hiking poles will be handy. After sunset, it gets dark in the canyon immediately. The hike might be dangerous in the dark, so take a good headlamp and do not miss the exit point. With a good GPS, it will be easier.
The Subway Zion Gear Recommendations
Most noteworthy is to prepare for this hike. So, check our list of 13 essentials of any hike. But, on this trek, you will spend a lot of time in the water. So, below, you will find a list of the essential water equipment you need for the Subway hike, as well as the best water shoes for hiking.
However, we recommend this gear if you are hiking during Spring when the water level is high and it’s cold and during winter (from late November) when the water is icy. Certainly, you can rent this gear from the Zion Outfitter in Springdale.
However, if you want to spend more than one day in the water, or you consider The Narrows hike or other slot canyons, where the water level might be higher, or you like water activities, it’s worth having your own gear.
The water is warmer during summer or fall. In our opinion, hiking sandals with excellent traction and a covered toe should be enough for walking in the water in summer. Another option is water wetsuit boots, which should be perfect, too.
However, we recommend hiking boots for the climb up and down. It’s very steep and involves losing terrain, and water boots are not right and safe for it. Trekking poles will be of great help during this hike. They help you avoid slipping and falling in the water.
Neoprene water socks are also a must-have for hiking in the water. And it’s better to have your pair than rent one. They should be 4-5 mm if the water temperature is moderate, but if the water is cold, consider a warmer, such as 7 mm.
For a day hike, consider a 35-l waterproof backpack to stow your gear, such as maps, a headlamp, food, extra clothes, and other items.
The Subway Zion Photography Hints & Gear
As we mentioned before, the best idea for the trek is late fall. The colors are stunning, and the stream level is safe for people and your photo gear. The best and most light in the Subway tube is around noon and early afternoon. So be in the Subway tunnel around 11 am to start your photos; it takes you around an hour or two to take pictures.
Remember, you have a long way back. A tripod is essential for this hike. The canyon is dark, so your shutter speeds may be several seconds long. Furthermore, the water in your photos will look much more natural with a slow shutter speed.
Pack minimally for this hike. We suggest taking only one lens, a wide-angle. With this lens, you will shoot great photos of Subway.
The trick is that you need to use a longer exposure to make the water stand still and look beautiful in the picture (please compare photographs from this article). It’s best to use your Tv, S, or M mode (time pre-selection mode or full manual mode) to get this effect.
In this mode, you can set your shutter speed to 1/8s-2s. To find proper exposure settings, you must take a couple of pictures, observe the desired effect, and adjust your settings accordingly. Check out our travel gear recommendations.
- A tripod for this hike is crucial. Canyon is dark, so your shutter speeds may be several seconds long. Furthermore, the water in your photos will look much more natural with a slow shutter speed. But, most of all, you need a reliable and heavy tripod. The stream current might be strong; during spring, it is intense. As a result, water can snatch a weak and unstable tripod and destroy your camera. We have used Sirui for years, and it’s a high-quality and reliable tripod.
- Take remote shutter release, too. A remote shutter release allows you to control the shutter through a remote control, which ensures you won’t have to touch your camera. As a result, you will eliminate any unwanted blur on your subject.
- Use the polarizer filter to reduce reflections on the water and other surfaces. Some filters may warm up your scene a little bit. It will help to produce that silky water effect. So, we recommend a Circular polarizing filter, ND grad filters (minimum Lee soft edge 0.9, Lee reverse ND grad and a holder), and full ND (Lee Big Stopper or Little Stopper).
- Use a dry bag to protect your gear against getting wet.
I have heard about this hike before and hopefully will get it ticked off when I eventually come to the area however I didnt know about the permit, so glad you mentioned that otherwise I would have turned up without it. 😀 I love the natural sights you came across on the trek (also didnt know it was eight miles) but so glad there is refreshing water on route. Nothing like putting cold water onto the face during a hike.
This is a hike we would probably never attempt. But interesting to read about. My orienteering is not good enough to ensure I found the path. And it is more strenuous than I could handle. A 400’ ascent at the end would be daunting. But your photos show a beautiful spot for experienced hikers to see.
p.p1 {margin: 0.0px 0.0px 0.0px 0.0px; font: 12.0px Helvetica; color: #454545}
OMG, what a fantastic hike, the views alone are amazing. I’ve yet to visit Zion but will make sure to plan time for this hike. First I have to get myself in shape. 8 miles? Yikes!
This sounds like a hike only suitable for people with experience and a certain level of fitness. It’s good that you explain as well that passes are required so that people don’t turn up and get disappointed. This is an excellent post to help people plan for this hike and a great chance for people to be properly prepared with the right kit.
What an adventurous hike and the natural scenery is truly gorgeous, I love it! Although I don’t think I’m experienced enough for it… I really like also how detailed your guide is, well done!
This is all very fascinating to me. Hiking through a subway tunnel crossing a cold river seems really interesting to me. Thanks for providing such amazing information. I am surely going to visit Zion with proper hiking accessories, permit, and guide.
The Subway hike in Zion National Park is a fantastic adventure and really looks interesting due to their special tunnel shape. The Subway though a small, but it is uniquely-shaped tube-like tunnel, and slot canyon within the Zion Wilderness in Zion National Park in Utah really looks very photogenic. The Red waterfalls look stunning as it has beautiful red back drop. Thanks for sharing wonderful place.
I am completely appalled as much as I am intrigued that I haven’t ventured for this hike yet. As someone who loves to explore new hiking trails, I would have loved. Honestly, the subway looks like something out of the movies. Definitely going to add in my list for the future.
What a great hike – a bit much for us – but it looks incredible! I don’t know that we’ve ever heard anyone we know who has been to Zion talk about this.
The photos are stunning and I love the idea of this hike. However, 8 hours difficult return hike in cold streams with the possibility of losing the trail does not meet my level of hiking expertise! But, totally impressed by you guys!
Every single time I read or hear something new about Zion, it just gives me that constant itchy feet! Such out of world landscape and hiking experiences! I would love to explore them! This subway looks super cool and totally something I would love to do!
Wow this place looks amazing, it is really cool
Your photos of the Subway are amazing. It’s the last thing to tick off my Zion bucketlist, but I was always too lazy to apply for the permit. According to your article, it seems to be even more popular now and harder to get a permit, so I wished I did it before.
Wow, your pictures make this hike look stunning! I’m sure it’s a wonderful hike with lots to see. I’m not a hard-core hiker and I would almost certainly get lost, lol! I’ll just enjoy your pictures 🙂
I have never been to Zion National Park, but my husband has and he loved it.
I love reading posts about adventures I’ll probably never experience myself – and this hike is one of those. Obviously, already the process of getting in is a small adventure in itself 😉 However, judging from your pictures it’s just so beautiful. Obviously, the solitude and serenity make these trails between waters and rock formations even more mesmerizing.
Wow, a day-long strenuous hike. I don’t think I will be able to do this but thanks for giving me a peek of the beauty!
555
1
1-1; waitfor delay ‘0:0:15’ —
1-1 waitfor delay ‘0:0:15’ —
1AcxsMUC6′; waitfor delay ‘0:0:15’ —
1-1) OR 27=(SELECT 27 FROM PG_SLEEP(15))–
1DKes7eyq’) OR 545=(SELECT 545 FROM PG_SLEEP(15))–
1
1
1
1
555
555
555
555
555
5550’XOR(555*if(now()=sysdate(),sleep(15),0))XOR’Z
555-1); waitfor delay ‘0:0:15’ —
555-1 OR 362=(SELECT 362 FROM PG_SLEEP(15))–
555’||DBMS_PIPE.RECEIVE_MESSAGE(CHR(98)||CHR(98)||CHR(98),15)||’
https://semaglupharm.com/# rybelsus for non diabetics
http://semaglupharm.com/# how to combat semaglutide fatigue
Crestor Pharm: Crestor Pharm – Best price for Crestor online USA
ezetimibe rosuvastatin combination brand name [url=http://crestorpharm.com/#]can crestor cause weight gain[/url] Safe online pharmacy for Crestor
Semaglu Pharm: rybelsus weight loss cost – does insurance cover semaglutide
https://semaglupharm.com/# semaglutide dosing chart
https://semaglupharm.shop/# rybelsus oral tablet
Predni Pharm: prednisone 1 tablet – 100 mg prednisone daily
prednisone in canada [url=http://prednipharm.com/#]PredniPharm[/url] PredniPharm
Crestor Pharm: Crestor Pharm – Online statin therapy without RX
http://semaglupharm.com/# Semaglu Pharm
Predni Pharm: prednisone medicine – prednisone prices
Crestor Pharm [url=https://crestorpharm.shop/#]CrestorPharm[/url] Crestor Pharm
https://semaglupharm.shop/# rybelsus 14
No doctor visit required statins: CrestorPharm – pravastatin vs rosuvastatin
https://crestorpharm.com/# CrestorPharm
Predni Pharm: cost of prednisone – PredniPharm
http://semaglupharm.com/# rybelsus picture
SemagluPharm [url=https://semaglupharm.shop/#]Semaglu Pharm[/url] SemagluPharm
how many mg is 20 units of semaglutide: SemagluPharm – liraglutide vs semaglutide
https://semaglupharm.com/# SemagluPharm
Crestor Pharm: what foods should be avoided when taking crestor – Order rosuvastatin online legally
rybelsus coupon no insurance: rybelsus generic name – Semaglu Pharm
LipiPharm [url=https://lipipharm.com/#]Discreet shipping for Lipitor[/url] LipiPharm
https://crestorpharm.shop/# CrestorPharm
https://semaglupharm.shop/# what drug class is rybelsus
Generic Lipitor fast delivery: Discreet shipping for Lipitor – Generic Lipitor fast delivery
Affordable Rybelsus price [url=https://semaglupharm.com/#]SemagluPharm[/url] Online pharmacy Rybelsus
https://semaglupharm.com/# semaglutide without insurance
rybelsus adverse effects: Order Rybelsus discreetly – semaglutide dosage schedule
SemagluPharm: SemagluPharm – SemagluPharm
what happens when you stop taking crestor [url=http://crestorpharm.com/#]Crestor Pharm[/url] Online statin therapy without RX
https://semaglupharm.shop/# Rybelsus 3mg 7mg 14mg
https://lipipharm.shop/# LipiPharm
prednisone over the counter australia: buy prednisone without rx – how to buy prednisone
Semaglu Pharm: SemagluPharm – Semaglu Pharm
rybelsus glp-1 [url=https://semaglupharm.shop/#]Semaglu Pharm[/url] Where to buy Semaglutide legally
https://semaglupharm.shop/# SemagluPharm
cheap prednisone 20 mg [url=https://prednipharm.com/#]PredniPharm[/url] prednisone 5 mg tablet rx
Order rosuvastatin online legally: Crestor Pharm – No doctor visit required statins
how much is lipitor 20mg: lipitor substitute – LipiPharm
http://semaglupharm.com/# SemagluPharm
SemagluPharm: п»їBuy Rybelsus online USA – SemagluPharm
Semaglu Pharm [url=https://semaglupharm.shop/#]semaglutide tablets vs injection[/url] Semaglu Pharm
rosuvastatin or atorvastatin: can crestor 40 mg be cut in half – Affordable cholesterol-lowering pills
http://semaglupharm.com/# Semaglu Pharm
Crestor Pharm: CrestorPharm – Crestor mail order USA
atorvastatin liver damage [url=https://lipipharm.com/#]atorvastatin and sex drive[/url] can you eat grapefruit with lipitor
No prescription diabetes meds online: SemagluPharm – Semaglu Pharm
https://semaglupharm.com/# SemagluPharm
Lipi Pharm [url=https://lipipharm.com/#]what is the most common side effect of lipitor?[/url] п»їBuy Lipitor without prescription USA
http://semaglupharm.com/# SemagluPharm
Order rosuvastatin online legally: Crestor Pharm – alternative to crestor
Crestor Pharm: can i take levothyroxine and rosuvastatin together – myalgia and crestor
https://crestorpharm.shop/# Crestor Pharm
https://medsfrommexico.com/# reputable mexican pharmacies online
top 10 online pharmacy in india: India Pharm Global – Online medicine order
India Pharm Global [url=https://indiapharmglobal.shop/#]India Pharm Global[/url] indian pharmacy paypal
canadian pharmacy no scripts: pharmacy canadian superstore – northwest pharmacy canada
http://medsfrommexico.com/# pharmacies in mexico that ship to usa
India Pharm Global: India Pharm Global – indian pharmacy
http://canadapharmglobal.com/# trusted canadian pharmacy
mexican border pharmacies shipping to usa [url=https://medsfrommexico.shop/#]Meds From Mexico[/url] Meds From Mexico
canadian family pharmacy: Canada Pharm Global – buying drugs from canada
https://indiapharmglobal.shop/# Online medicine home delivery
cheap canadian pharmacy online: canada pharmacy world – northern pharmacy canada
India Pharm Global [url=https://indiapharmglobal.shop/#]India Pharm Global[/url] India Pharm Global
buying from online mexican pharmacy: Meds From Mexico – Meds From Mexico
https://medsfrommexico.com/# mexico drug stores pharmacies
https://canadapharmglobal.shop/# safe canadian pharmacies
India Pharm Global: cheapest online pharmacy india – India Pharm Global
mexican mail order pharmacies [url=http://medsfrommexico.com/#]mexico drug stores pharmacies[/url] pharmacies in mexico that ship to usa
India Pharm Global: reputable indian pharmacies – India Pharm Global
https://canadapharmglobal.com/# trusted canadian pharmacy
mail order pharmacy india: India Pharm Global – best india pharmacy
canada drugs online review [url=https://canadapharmglobal.com/#]canada pharmacy world[/url] safe canadian pharmacy
buy prescription drugs from canada cheap: canadapharmacyonline – canadian pharmacy review
https://medsfrommexico.com/# Meds From Mexico
mexican drugstore online: medicine in mexico pharmacies – medicine in mexico pharmacies
https://medsfrommexico.com/# п»їbest mexican online pharmacies
reputable indian pharmacies [url=http://indiapharmglobal.com/#]India Pharm Global[/url] India Pharm Global
https://medsfrommexico.shop/# buying prescription drugs in mexico
reputable indian online pharmacy: mail order pharmacy india – India Pharm Global
canadian pharmacy online: Canada Pharm Global – canada drugstore pharmacy rx
http://indiapharmglobal.com/# India Pharm Global
canadian pharmacies online [url=http://canadapharmglobal.com/#]Canada Pharm Global[/url] reliable canadian pharmacy
India Pharm Global: india pharmacy mail order – india pharmacy
п»їbest mexican online pharmacies: mexican border pharmacies shipping to usa – Meds From Mexico
https://canadapharmglobal.shop/# canadian neighbor pharmacy
https://medsfrommexico.com/# mexican rx online
India Pharm Global [url=https://indiapharmglobal.com/#]cheapest online pharmacy india[/url] India Pharm Global
indian pharmacy paypal: top online pharmacy india – buy medicines online in india
mexican drugstore online: mexican drugstore online – Meds From Mexico
http://svenskapharma.com/# mitella apotek
Svenska Pharma [url=https://svenskapharma.com/#]Svenska Pharma[/url] Svenska Pharma
nesespray apotek: Rask Apotek – aktivt kull apotek
Papa Farma: Papa Farma – Papa Farma
http://svenskapharma.com/# Svenska Pharma
https://efarmaciait.shop/# EFarmaciaIt
Papa Farma [url=https://papafarma.shop/#]Papa Farma[/url] Papa Farma
EFarmaciaIt: telefono satispay – farma top
Svenska Pharma: Svenska Pharma – hur mycket Г¤r 10 ml
https://svenskapharma.com/# Svenska Pharma
Papa Farma [url=http://papafarma.com/#]Papa Farma[/url] Papa Farma
http://svenskapharma.com/# Svenska Pharma
EFarmaciaIt: EFarmaciaIt – EFarmaciaIt
meglio vertiserc o microser: EFarmaciaIt – desamix effe o gentalyn beta
https://raskapotek.shop/# apotek norge
farmacia espana [url=https://papafarma.shop/#]Papa Farma[/url] farmacia la cuesta
Svenska Pharma: jod mot strГҐlning apotek – Svenska Pharma
https://svenskapharma.shop/# Svenska Pharma
https://raskapotek.shop/# Rask Apotek
Rask Apotek: Rask Apotek – Rask Apotek
https://raskapotek.com/# halsbrann apotek
EFarmaciaIt [url=http://efarmaciait.com/#]EFarmaciaIt[/url] sildenafil compresse
is wegovy available in spain: farmacia 1 – Papa Farma
https://papafarma.shop/# farmacia online barata y fiable
bestГ¤ll medicin: klor utslag bilder – Svenska Pharma
http://efarmaciait.com/# EFarmaciaIt
blodtrycksmГ¤tning apotek: Svenska Pharma – apotek hemleverans recept
Papa Farma [url=https://papafarma.com/#]farmacia barata cordoba[/url] Papa Farma
https://efarmaciait.com/# EFarmaciaIt
Rask Apotek: Rask Apotek – munnskold apotek
Svenska Pharma: apotek omeprazol – Svenska Pharma
http://raskapotek.com/# hårfiber apotek
Rask Apotek [url=http://raskapotek.com/#]Rask Apotek[/url] Rask Apotek
Papa Farma: malaga taxfree – venta de farmacias en madrid
https://svenskapharma.shop/# receptfria läkemedel mot inkontinens
https://efarmaciait.shop/# EFarmaciaIt
EFarmaciaIt: EFarmaciaIt – herbalife recensioni
Papa Farma [url=https://papafarma.shop/#]farmacia la salud[/url] Papa Farma
Papa Farma: Papa Farma – Papa Farma
http://svenskapharma.com/# munskydd tvättbart apotek
limpiador nasal: farmacia estados unidos – zoely opiniones
Svenska Pharma [url=https://svenskapharma.com/#]Svenska Pharma[/url] Svenska Pharma
Svenska Pharma: Svenska Pharma – billiga vitaminer
http://raskapotek.com/# rispose varme apotek
http://raskapotek.com/# Rask Apotek
eu pharmacy viagra: gelasimi amazon – Papa Farma
Papa Farma [url=https://papafarma.com/#]viagra barcelona[/url] Papa Farma
https://raskapotek.com/# lakrispulver apotek
Svenska Pharma: doppler gravid apotek – Svenska Pharma
sjekk av fГёflekker apotek: apotek ГҐpent i pГҐsken – billigste apotek
https://svenskapharma.com/# acne plåster apotek
https://medicijnpunt.shop/# Medicijn Punt
tadalafil 20 mg effet [url=http://pharmaconfiance.com/#]cialis achat pharmacie en ligne[/url] Pharma Confiance
https://pharmaconnectusa.shop/# diabetes
ddd vite fait: achat cialis pharmacie en ligne – soolantra creme prix
Pharma Jetzt: versandapotheken in deutschland – apotehke
https://pharmaconfiance.com/# Pharma Confiance
Medicijn Punt [url=http://medicijnpunt.com/#]MedicijnPunt[/url] farmacie online
pharmecie: arthrose et intestin irritable – chaussures spГ©ciales arthrose femme
https://medicijnpunt.shop/# MedicijnPunt
pharmacies en ligne: pharamcie en ligne – Pharma Confiance
https://pharmajetzt.com/# Pharma Jetzt
medicatie online [url=http://medicijnpunt.com/#]apotheke online[/url] apotheken in holland
quand prendre ketoprofene: Pharma Confiance – cdg orne
prednisone online pharmacy: united rx pharmacy – PharmaConnectUSA
http://pharmajetzt.com/# Pharma Jetzt
Pharma Confiance [url=https://pharmaconfiance.shop/#]Pharma Confiance[/url] Pharma Confiance
PharmaJetzt: Pharma Jetzt – luitpold-apotheke selbitz
https://pharmaconnectusa.shop/# finpecia online pharmacy
https://pharmaconnectusa.shop/# Pharma Connect USA
PharmaJetzt [url=https://pharmajetzt.com/#]Pharma Jetzt[/url] apotheken online shop
Pharma Jetzt: Pharma Jetzt – apotheke internet
MedicijnPunt: apotheken in holland – MedicijnPunt
https://pharmajetzt.shop/# Pharma Jetzt
internet apotheek nederland [url=https://medicijnpunt.shop/#]apotheker medicatie[/url] europese apotheek
https://medicijnpunt.com/# medicijnen bestellen zonder recept
Medicijn Punt: internetapotheek spanje – Medicijn Punt
https://pharmaconnectusa.shop/# low dose naltrexone online pharmacy
PharmaConnectUSA: tesco pharmacy orlistat – best retail pharmacy viagra price
PharmaJetzt: PharmaJetzt – Pharma Jetzt
https://pharmaconnectusa.shop/# online pharmacy usa legal
regarder syndrome e en ligne: vitamine c upsa combien par jour – prix du viagra avec ordonnance
MedicijnPunt [url=https://medicijnpunt.com/#]online medicijnen bestellen zonder recept[/url] Medicijn Punt
https://pharmaconnectusa.com/# PharmaConnectUSA
pharma online: nieuwe pharma – niederlande apotheke
australian pharmacy cialis: Pharma Connect USA – best online pharmacy to buy viagra
https://pharmaconnectusa.shop/# Pharma Connect USA
http://medicijnpunt.com/# online apotheek zonder recept ervaringen
Pharma Connect USA [url=https://pharmaconnectusa.com/#]anti-depressants[/url] Pharma Connect USA
Pharma Jetzt: Pharma Jetzt – ihre apotheken de
MedicijnPunt: medicijnen bestellen zonder recept – apotheek webshop
https://medicijnpunt.com/# netherlands online pharmacy
viagra tarif [url=https://pharmaconfiance.com/#]Pharma Confiance[/url] avis donner ddp-80
apotheek webshop: mijn medicijnkosten – MedicijnPunt
PharmaConnectUSA: anti-depressants – PharmaConnectUSA
https://pharmaconnectusa.shop/# mexico viagra pharmacy
https://pharmaconnectusa.com/# Flomax
commander du viagra en toute sГ©curitГ© [url=http://pharmaconfiance.com/#]tadalafil 5 mg prix en pharmacie[/url] pharmacie de nuit rennes
MedicijnPunt: holandia apteka internetowa – beste online apotheek
Pharma Connect USA: Pharma Connect USA – PharmaConnectUSA
http://medicijnpunt.com/# Medicijn Punt
apotal shop apotheke [url=https://pharmajetzt.shop/#]shop apot[/url] apotheke shop
PharmaConnectUSA: PharmaConnectUSA – ventolin target pharmacy
Pharma Jetzt: PharmaJetzt – PharmaJetzt
https://medicijnpunt.shop/# MedicijnPunt
http://pharmaconfiance.com/# Pharma Confiance
Pharma Jetzt [url=http://pharmajetzt.com/#]PharmaJetzt[/url] Pharma Jetzt
apotheek webshop: dokter online medicijnen bestellen – Medicijn Punt
PharmaJetzt: internetapotheken – PharmaJetzt
https://medicijnpunt.shop/# Medicijn Punt
Pharma Confiance: Pharma Confiance – soolantra sans ordonnance
Medicijn Punt: MedicijnPunt – MedicijnPunt
https://pharmaconnectusa.shop/# PharmaConnectUSA
http://pharmaconfiance.com/# Pharma Confiance
efficacitГ© monuril: prendre cialis et viagra ensemble – est-ce que doxycycline fait grossir
Pharma Confiance [url=https://pharmaconfiance.shop/#]Pharma Confiance[/url] Pharma Confiance
Medicijn Punt: apteka nl – online apotheek frankrijk
http://pharmaconfiance.com/# Pharma Confiance
PharmaConnectUSA: Pharma Connect USA – Pharma Connect USA
viagra in hong kong pharmacy [url=https://pharmaconnectusa.shop/#]cost of lipitor at target pharmacy[/url] cefixime online pharmacy
https://pharmaconfiance.com/# Pharma Confiance
Medicijn Punt: medicijnen zonder recept kopen – MedicijnPunt
online pharmacy france: ou trouver argel 7 – site pharmacie
peut on retourner un mГ©dicament en pharmacie [url=https://pharmaconfiance.com/#]Pharma Confiance[/url] Pharma Confiance
http://pharmaconnectusa.com/# cefixime online pharmacy
https://pharmajetzt.com/# Pharma Jetzt
Pharma Connect USA: cyclophosphamide online pharmacy – tadalafil usa pharmacy
pharmacie ou parapharmacie: Pharma Confiance – Pharma Confiance
PharmaJetzt [url=http://pharmajetzt.com/#]PharmaJetzt[/url] Pharma Jetzt
https://medicijnpunt.com/# medicijnen bestellen zonder recept
PharmaConnectUSA: Pharma Connect USA – PharmaConnectUSA
Medicijn Punt: MedicijnPunt – MedicijnPunt
Pharma Confiance [url=http://pharmaconfiance.com/#]bebe 15 jours 120 ml[/url] Pharma Confiance
http://medicijnpunt.com/# medicatie online
https://pharmaconnectusa.shop/# PharmaConnectUSA
pharmacy rx one review: PharmaConnectUSA – my 24 hour pharmacy online
celebrex pharmacy prices: legit online pharmacy – Pharma Connect USA
http://pharmajetzt.com/# PharmaJetzt
Sumycin [url=http://pharmaconnectusa.com/#]online pharmacy reviews cialis[/url] PharmaConnectUSA
Pharma Jetzt: internet apotheke selbitz – PharmaJetzt
https://medicijnpunt.shop/# Medicijn Punt
mexico online pharmacy: PharmaConnectUSA – PharmaConnectUSA
apozheke [url=https://pharmajetzt.com/#]luitpold apotheke online-shop versandapotheke[/url] Pharma Jetzt
https://medicijnpunt.com/# MedicijnPunt
apotheke online: internet apotheek – online pharmacy
https://pharmajetzt.shop/# Pharma Jetzt
medicijne: Medicijn Punt – MedicijnPunt
shop apotheken [url=https://pharmajetzt.com/#]apotheken online bestellen[/url] Pharma Jetzt
Pharma Jetzt: apothe online – online apotheke deutschland
online medicijnen bestellen apotheek: pharmacy online netherlands – MedicijnPunt
https://medicijnpunt.com/# MedicijnPunt
https://medicijnpunt.com/# snel medicijnen bestellen
Pharma Confiance [url=http://pharmaconfiance.com/#]maquillage indien adulte[/url] Pharma Confiance
PharmaJetzt: Pharma Jetzt – Pharma Jetzt
comprimГ© ketoprofene: Г quoi sert l’huile d’amande douce – ketoprofene 200 mg
https://pharmaconfiance.shop/# metronidazole prix
nutrim kapseln erfahrungen: Pharma Jetzt – Pharma Jetzt
MedicijnPunt: MedicijnPunt – Medicijn Punt
Pharma Confiance [url=https://pharmaconfiance.com/#]sildenafil ordonnance en ligne[/url] Pharma Confiance
http://pharmajetzt.com/# welche online apotheke ist die günstigste
PharmaJetzt: gГјnstigste versandapotheke – PharmaJetzt
https://pharmaconfiance.shop/# allergie au chat du jour au lendemain
apotheke bad steben: medikamente bestellen sofort – apotheke bad steben
nuxe anti rides [url=https://pharmaconfiance.com/#]Pharma Confiance[/url] french cold medicine
apotal apotheke online bestellen: appotheke – PharmaJetzt
MedicijnPunt: apotheek medicijnen – betrouwbare online apotheek
http://medicijnpunt.com/# MedicijnPunt
Pharma Confiance: prix cialis pharmacie – produits pharmaceutique
paraphamarcie: amoxicilline 1000 mg – Pharma Confiance
https://pharmaconfiance.com/# Pharma Confiance
MedicijnPunt [url=https://medicijnpunt.com/#]apotheke niederlande[/url] Medicijn Punt
https://pharmaconfiance.shop/# farmacie franta
PharmaConnectUSA: drug store near me – giant eagle pharmacy
internetapotheek nederland: inloggen apotheek – Medicijn Punt
comment prendre amoxicilline 500 mg: creme betamethasone 0 05 – Pharma Confiance
PharmaJetzt: Pharma Jetzt – PharmaJetzt
https://pharmaconfiance.com/# pharma
apotheke online bestellen [url=https://pharmajetzt.shop/#]größte online apotheke[/url] schop apoteke
http://medicijnpunt.com/# snel medicijnen bestellen
soolantra prix pharmacie: Pharma Confiance – Pharma Confiance
huisapotheek online: Medicijn Punt – MedicijnPunt
http://medicijnpunt.com/# Medicijn Punt
best us online pharmacy [url=https://pharmaconnectusa.com/#]PharmaConnectUSA[/url] Pharma Connect USA
Pharma Connect USA: Pharma Connect USA – best pharmacy price on viagra
gГјnstigste online apotheke: PharmaJetzt – Pharma Jetzt
phzrmacie: parfum fleurs de bach avis – Pharma Confiance
http://pharmaconnectusa.com/# Pharma Connect USA
luitpold apotheke bad steben online-shop: Pharma Jetzt – PharmaJetzt
https://pharmajetzt.shop/# PharmaJetzt
pharmacie de garde a caen [url=https://pharmaconfiance.shop/#]Pharma Confiance[/url] produit vea pas cher
apteka nl online: medicijnen zonder recept kopen – MedicijnPunt
https://medicijnpunt.shop/# Medicijn Punt
mijn apotheek: apotheek online – MedicijnPunt
Pharma Confiance [url=http://pharmaconfiance.com/#]Pharma Confiance[/url] pharmacie du soleil cannes
PharmaJetzt: Pharma Jetzt – Pharma Jetzt
https://pharmaconfiance.com/# Pharma Confiance
Pharma Confiance: laboratoire de garde strasbourg – grd france
https://medicijnpunt.shop/# Medicijn Punt
Pharma Confiance: Pharma Confiance – pharmacie*
Pharma Confiance [url=https://pharmaconfiance.shop/#]pompe vacuum avis[/url] parafarmacie
Pharma Confiance: Pharma Confiance – Pharma Confiance
http://medicijnpunt.com/# uw apotheek
ibuprofene espagne: Pharma Confiance – Pharma Confiance
apotheken internet: PharmaJetzt – deutschland apotheke
https://tijuanameds.shop/# TijuanaMeds
https://tijuanameds.com/# best online pharmacies in mexico
IndiMeds Direct [url=http://indimedsdirect.com/#]IndiMeds Direct[/url] IndiMeds Direct
trusted canadian pharmacy: canadian pharmacy ltd – canadian pharmacy prices
safe canadian pharmacies: CanRx Direct – canadian drugs
https://canrxdirect.com/# cheap canadian pharmacy
IndiMeds Direct [url=https://indimedsdirect.shop/#]IndiMeds Direct[/url] online shopping pharmacy india
online pharmacy india: IndiMeds Direct – IndiMeds Direct
online shopping pharmacy india: IndiMeds Direct – IndiMeds Direct
https://tijuanameds.shop/# TijuanaMeds
https://tijuanameds.shop/# TijuanaMeds
IndiMeds Direct [url=https://indimedsdirect.shop/#]india pharmacy mail order[/url] IndiMeds Direct
TijuanaMeds: best online pharmacies in mexico – TijuanaMeds
https://indimedsdirect.shop/# IndiMeds Direct
best india pharmacy [url=https://indimedsdirect.shop/#]top 10 online pharmacy in india[/url] indian pharmacy
trusted canadian pharmacy: CanRx Direct – pharmacy com canada
mexican mail order pharmacies: mexican mail order pharmacies – mexican online pharmacies prescription drugs
https://canrxdirect.shop/# the canadian drugstore
https://indimedsdirect.com/# buy medicines online in india
indianpharmacy com [url=https://indimedsdirect.com/#]IndiMeds Direct[/url] india online pharmacy
ed drugs online from canada: CanRx Direct – canadian pharmacy mall
https://tijuanameds.shop/# medication from mexico pharmacy
thecanadianpharmacy [url=https://canrxdirect.com/#]CanRx Direct[/url] canadian drug pharmacy
mexico pharmacies prescription drugs: TijuanaMeds – mexican online pharmacies prescription drugs
http://tijuanameds.com/# pharmacies in mexico that ship to usa
is canadian pharmacy legit: CanRx Direct – canadian pharmacy
mexican drugstore online [url=http://tijuanameds.com/#]TijuanaMeds[/url] TijuanaMeds
https://tijuanameds.com/# mexico pharmacies prescription drugs
https://yalla-ludo.com/d985d988d8b9d8af-d988d8a7d984d982d986d8a7d8a9-d8a7d984d986d8a7d982d984d8a9-d984d985d8a8d8a7d8b1d8a7d8a9-d8a8d8b1d8b4d984d988d986d8a9/
https://ufl-football-game.com/d8a8d8b9d8af-d8a7d984d8a7d986d8b6d985d8a7d985-d984d980-d8a7d984d8a3d987d984d98a-d985d8a7d8b0d8a7-d982d8afd985-d985d8add985d8af-d8b9/
buying drugs from canada: legitimate canadian online pharmacies – canadian drugs pharmacy
https://w99om1wu.com/qual-foi-a-ultima-copa-do-mundo-que-o-brasil-venceu-no-futebol-masculino/
https://football-results-eg.com/d982d8a7d8a6d985d8a9-d8a7d984d8a8d8b1d8aad8bad8a7d984-d984d985d8a8d8a7d8b1d8a7d8aad98a-d8a7d984d8afd986d985d8a7d8b1d983-d981d98a-d8af/
pharmacy website india: online shopping pharmacy india – indian pharmacy
canadian compounding pharmacy [url=https://canrxdirect.com/#]canadian pharmacy price checker[/url] safe canadian pharmacy
https://tijuanameds.shop/# best online pharmacies in mexico
https://97ui8ahx.com/uefa-investiga-mbappe-vini-jr-e-mais-2-jogadores-por-conduta-indecente/