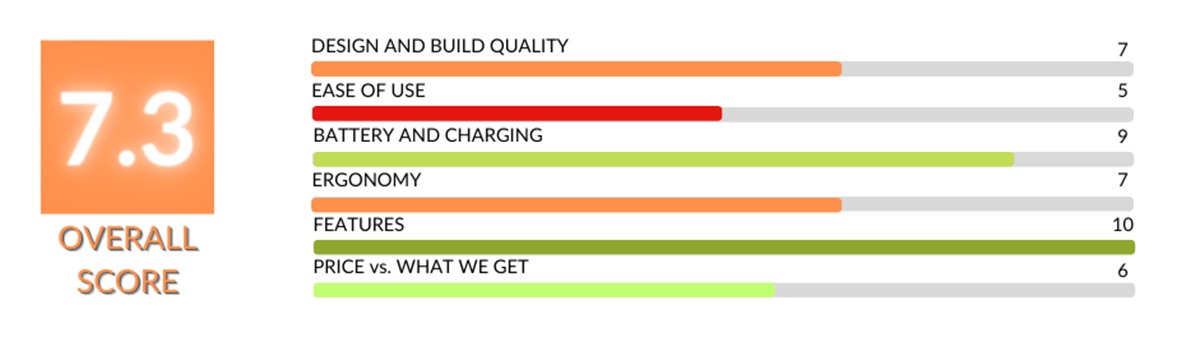
DJI Osmo Mobile 6 Review
It might seem strange that we are reviewing DJI Osmo Mobile 6 mainly because we have always been photographing. Making movies has never been our passion. However, recent years have brought a lot of changes in this area. This is primarily due to the incredibly rapid development of smartphones. Their video recording capabilities compare to the best cameras from many years ago. However, the difference is that we always have the phone and can shoot a short clip everywhere. So we decided to purchase DJI Osmo Mobile 6 and share the pros and cons in this review.
This article may contain affiliate / compensated links. For full information, please see our disclaimer here.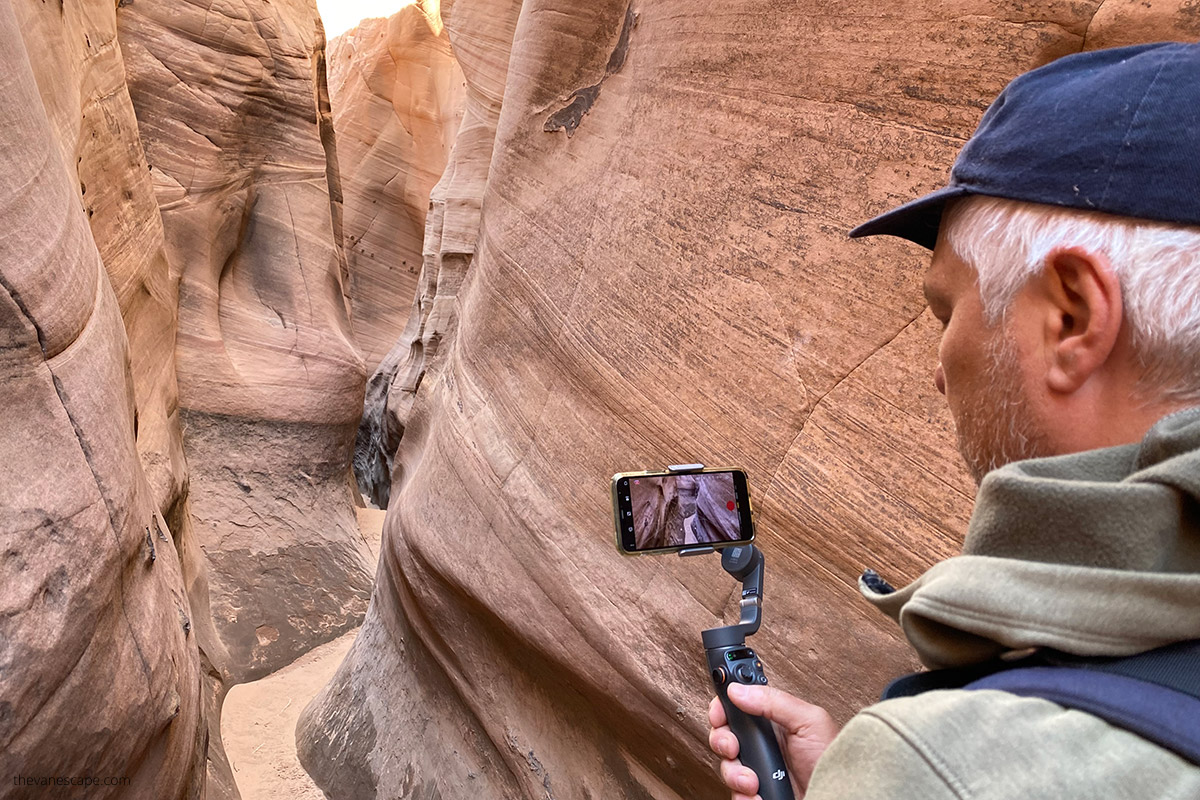
DJI Osmo Mobile 6 Review – Our Experiences
Since we record videos with the smartphone and then try to put together the material with the one recorded with the DJI Mini 3 Pro drone or the DJI Osmo Pocket camera, the content from the phone could be of better quality, especially when it comes to stabilization.
In addition, if you’ve ever tried to take a good selfie with your phone, you know it’s difficult because even when you set the frame, there’s always a problem with pressing the release button. DJI Osmo Pocket 6 came to help us.
Another reason why my partner Chris and I decided to buy this gimbal stabilizer is that you cannot use the drone in national parks, wilderness areas, national monuments, and most state parks. But we wanted to have a chance to shoot short videos in these places. So we decided to pair the phone with DJI Osmo Mobile 6.
We also want to emphasize that this is not a sponsored post. We bought this device on our own on Amazon. After a couple of months of experience with this device, we share our thoughts below. Was it worth it?
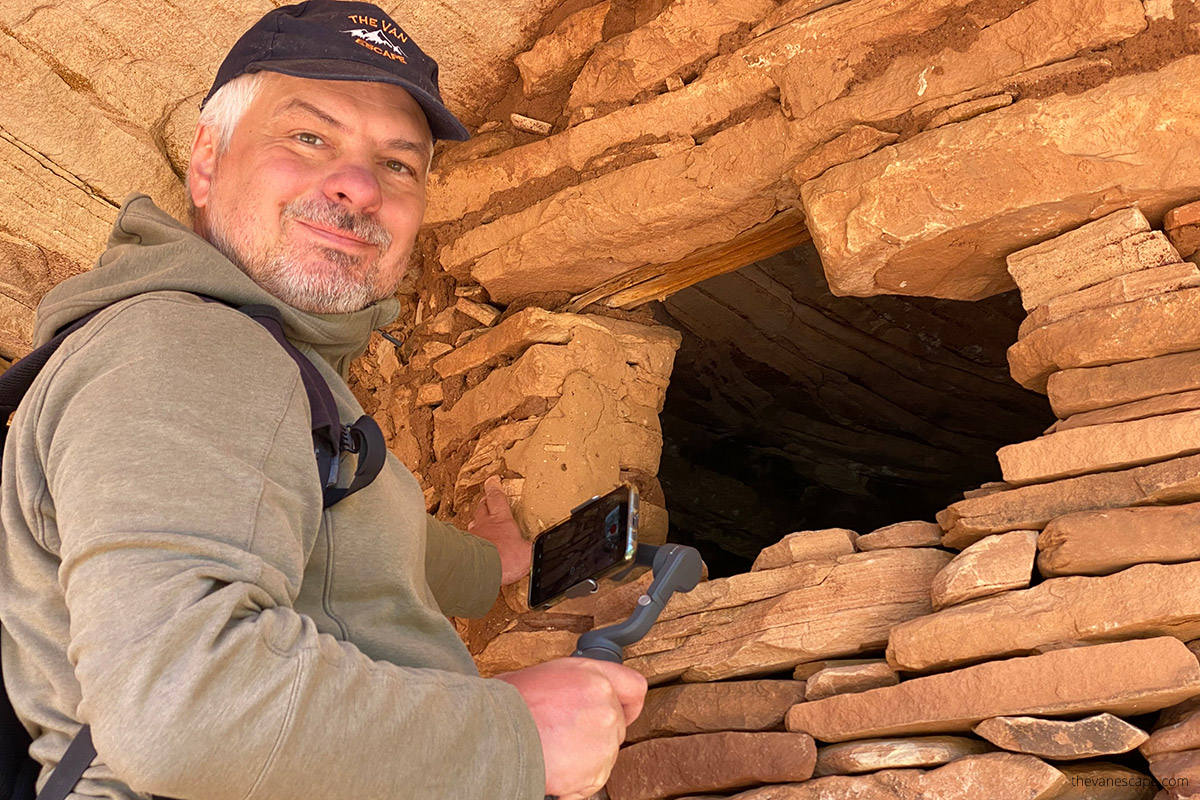
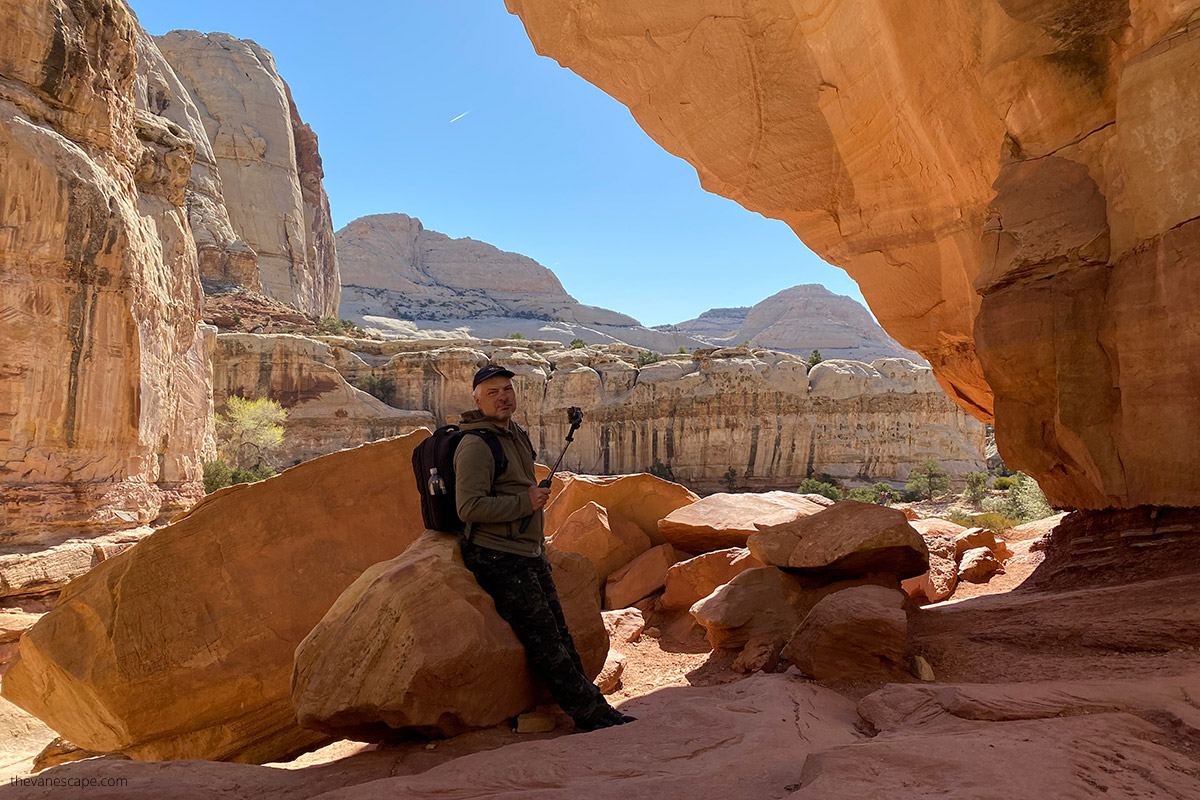
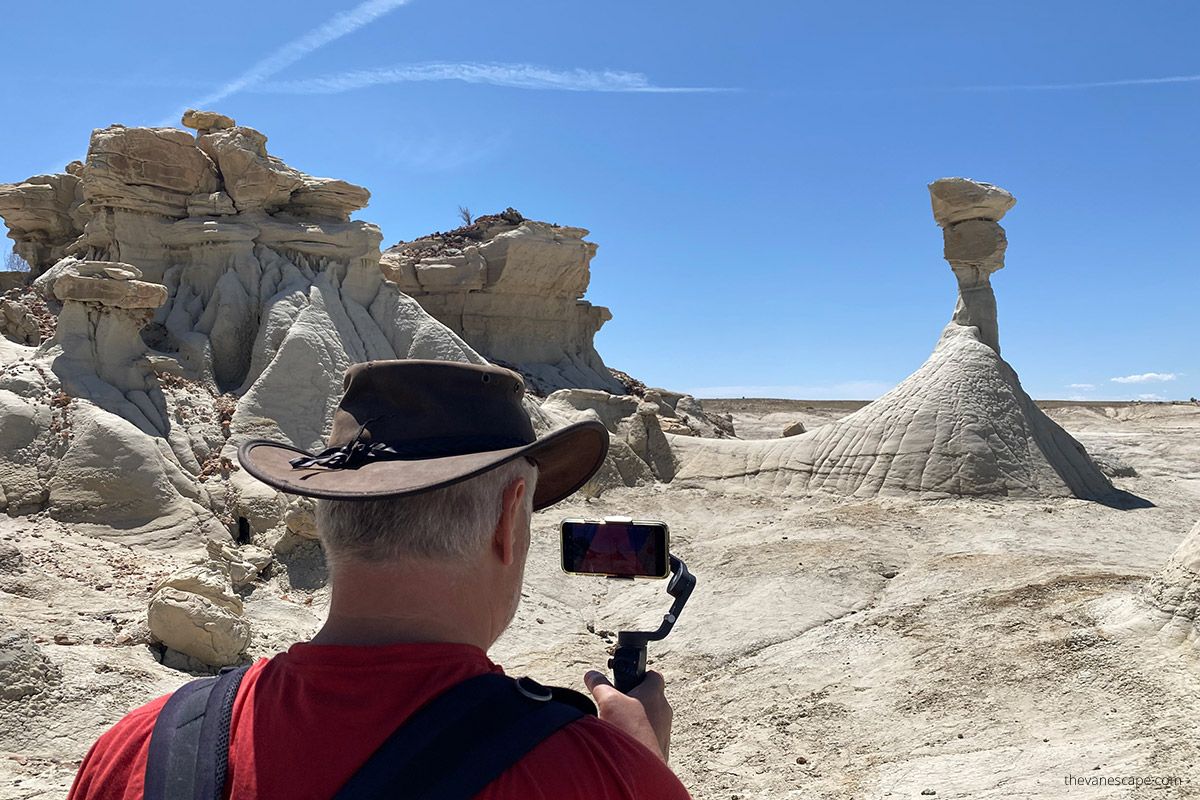
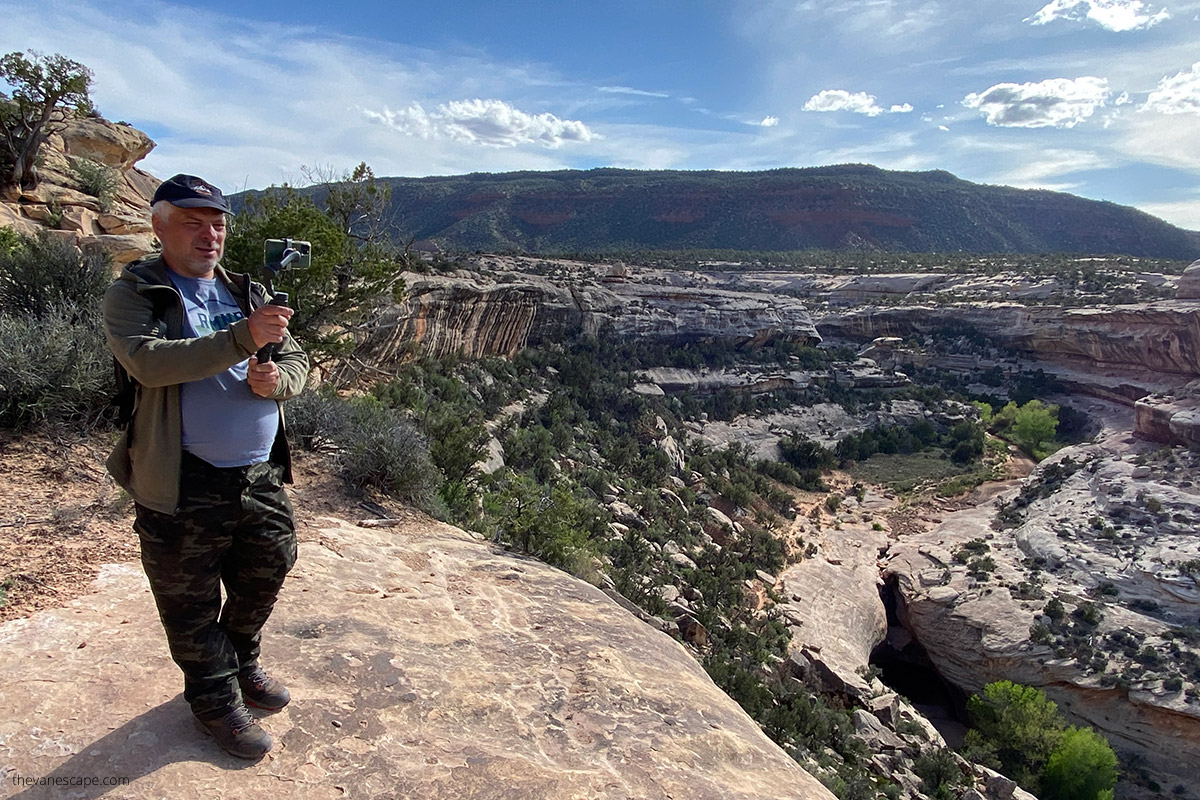
In the images below, my partner Chris takes short videos with the DJI Osmo Mobile 6 stabilizer at Joshua Tree National Park in California and Capitol Reef NP in Utah. A few chapters down, you can see the first video we shot with this stabilizer (please bear with us, we’re just learning to make videos).
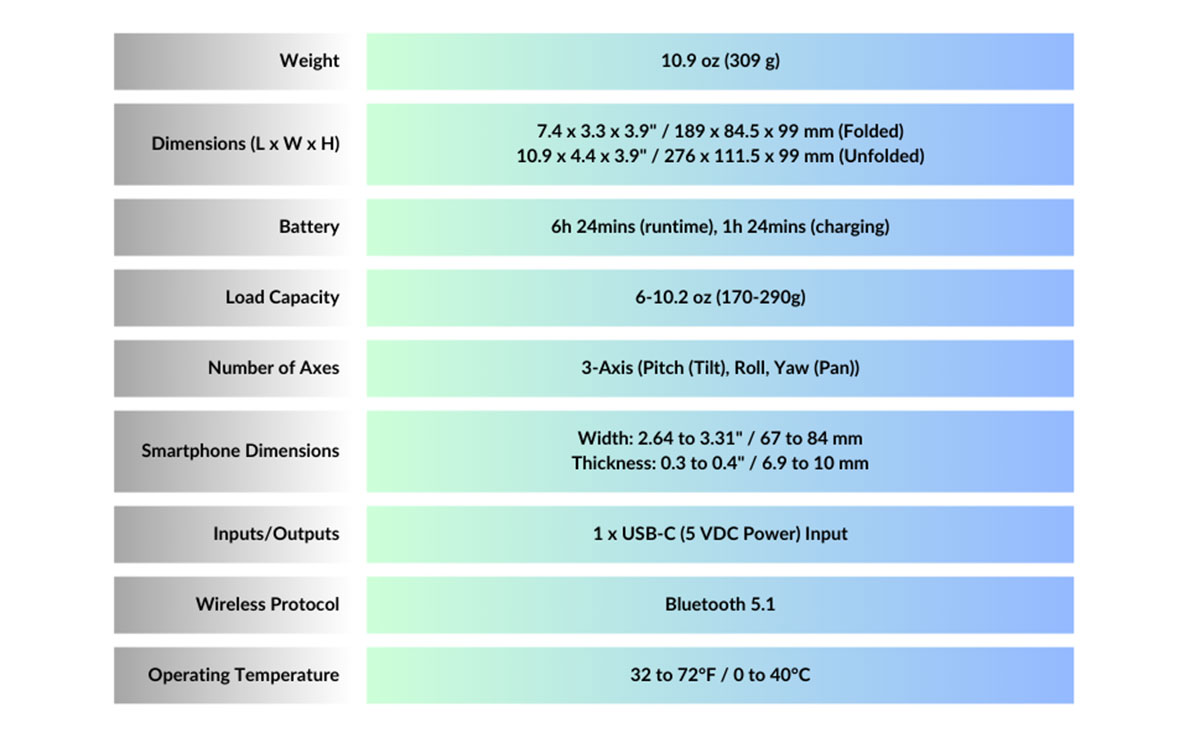
DJI Osmo Mobile 6 Review- Specs at a Glance
DJI Osmo Mobile 6 Construction
Construction
At first, the construction of this device disappointed me. The folded version looks neat and compact, but unfolding can be unnatural. At first, I wasn’t sure if I would damage something by unfolding it to the working position. The construction looked fragile, and I was afraid something might break.
Fortunately, after a few times, I understood how it worked and got used to it. However, it is worth mentioning that this is not intuitive, and the instructions could be more precise.
Components
DJI Osmo Mobile 6 comes in an excellent package with several components. The main one is a gimbal that folds to a small size. When folded, it fits easily in a pocket. Another piece is a phone holder attached to the gimbal with a magnet for this.
The whole set is complemented by a small tripod screwed into the gimbal from the bottom. At first, it seemed to me that it would not be needed, but the permanent calibration requirement meant I always had it with me. Everything can be packed in an elegant bag in which the device is easily transported.
Buttons
Another essential design element is a set of buttons. After some time, you have to get used to their use, and they are pretty intuitive. In practice, three fingers are used as the gimbal has buttons on the front, back, and side.
We have a zoom/focus side wheel (on the left side) – it could be more precise, but after gaining some practice, you can effectively operate the zoom from the gimbal position. On the front, we have a Power/Mode button (more on that later), a joystick for gimbal operation, a shutter/record button, and an additional function switch. On the back, we have a second convenient trigger switch.
You can also find a small status panel showing the current operation mode and USB-C charging port.
But it’s not everything. We can also expand the gimbal to 8.5″ with a telescopic extension rod and tilt it from 0 to 90 degrees.
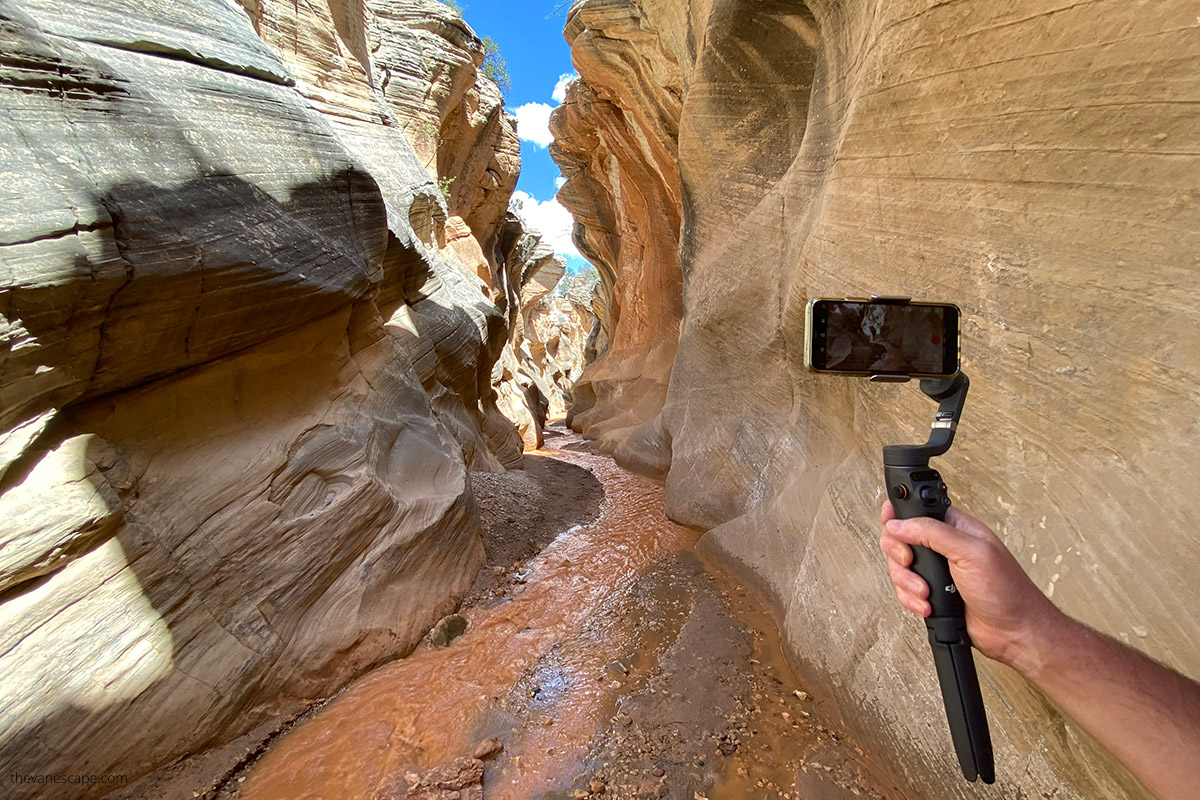
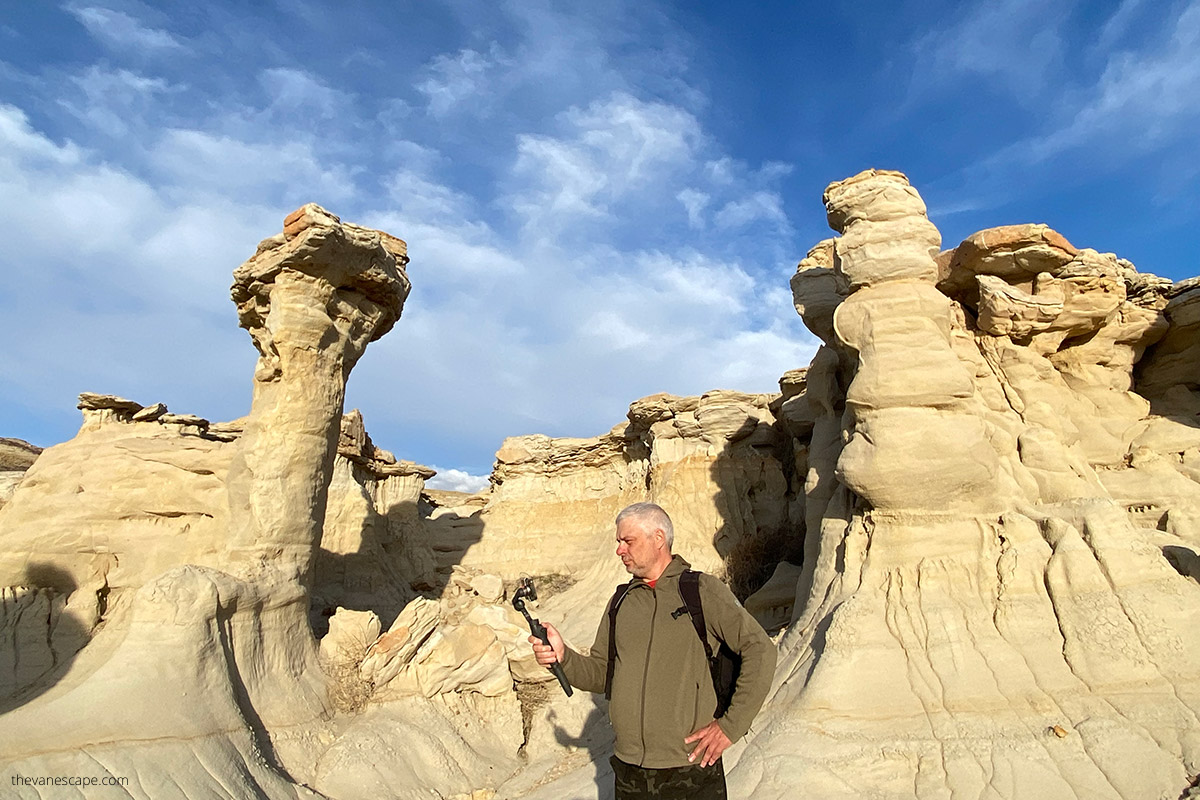
The gimbal stabilizer worked great for short films in slot canyons in Utah. We used it for Zebra Slot Canyon and Willis Creek Slot Canyon.
Ergonomy of DJI Osmo Mobile 6
The device’s ergonomy is rather good, but it takes time to learn to use all the buttons, dials, and switches intuitively. The only problem with the side wheel is that it could be more precise; everything else is natural and easy to learn over time.
It’s worth mentioning what kind of buttons are available on the DJI Osmo Mobile 6:
- M button – turns on and off the device (you can also turn it on/off with folding/unfolding process)
- Side Wheel – it has two functions – if you press it, you choose between autofocus and zoom mode, and in each mode wheel allows you to focus or zoom on the frame
- Joystick – allows you to tilt and pan the phone vertically and horizontally.
- Shutter/Record button – press once to shoot a photo or stop/start recording video. If you hold it, it will take burst photos. Holding does not work in video mode.
- Switch button – allows you to switch between front and rear camera, but if you press it twice, it switches between portrait and landscape mode, and if pressed three times, it changes photo mode to video and the other way round.
- Trigger – the most advanced steering button allows you to start or stop Active Track 5.0, recenter the gimbal, or adjust follow the speed
I am not happy about this device because the phone mount is unstable, and if you move the phone in the clamp, it very often needs recalibration. This is not a complicated process, but it requires a tripod and takes about 2 minutes. It’s very tiring (similar to old drone calibration). Otherwise, you might have no even horizon on your recordings, so taking care of proper calibration is essential.
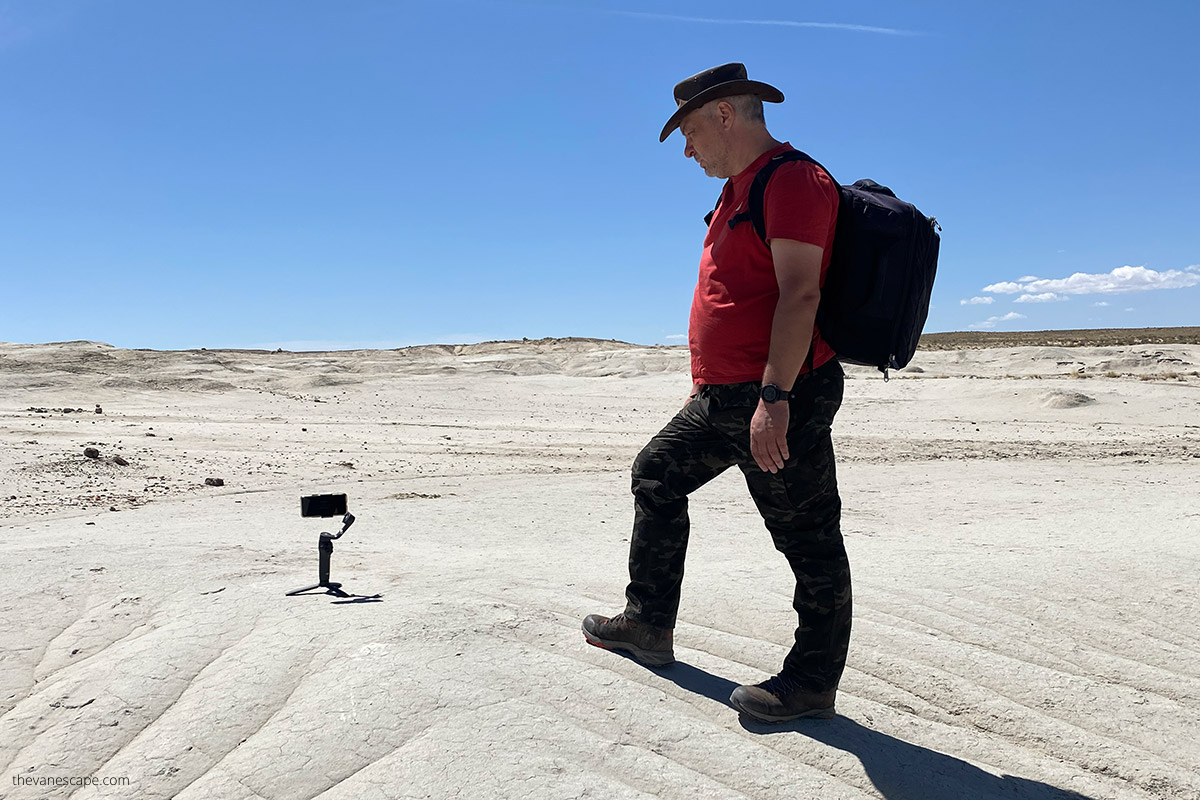
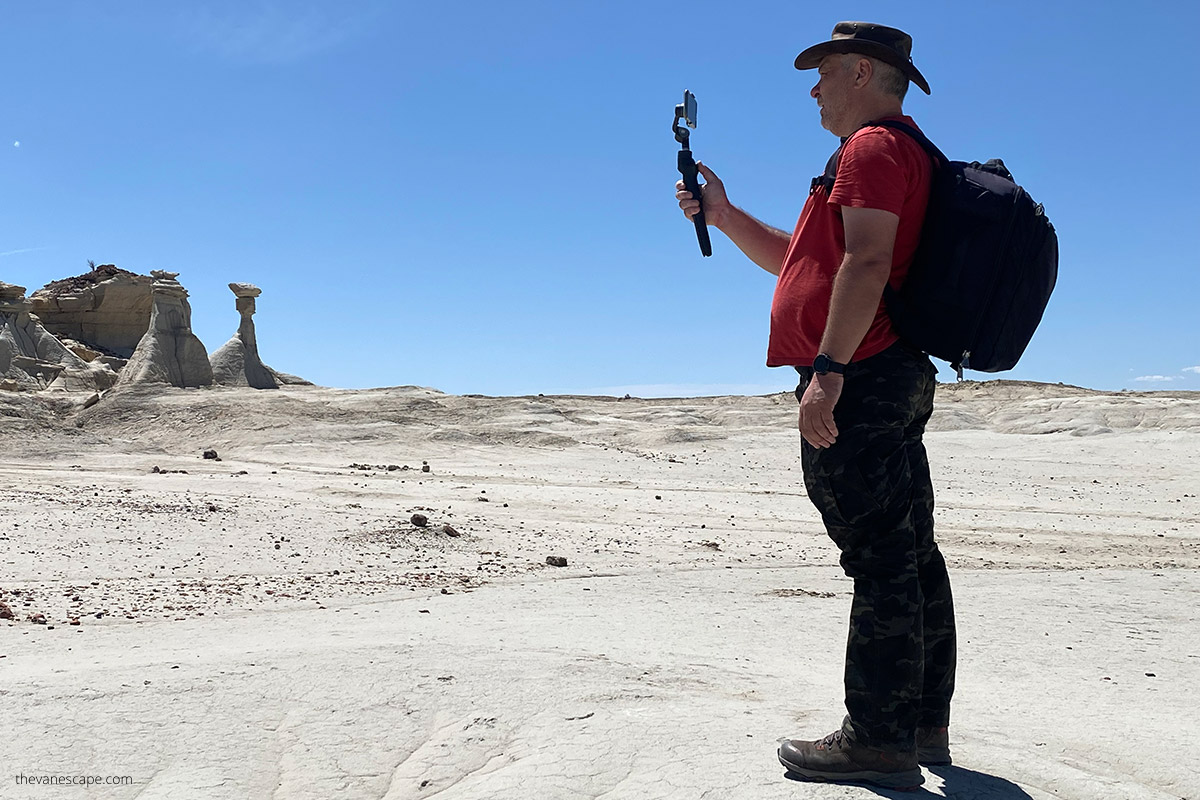
In the photos below, Chris uses a DJI Osmo Mobile 6 for short videos in the Ah-Shi-Sle-Pah Wilderness Area in New Mexico. Since drones are prohibited in wilderness areas, we bought a gimbal stabilizer for short videos of these surreal places.
DJI Osmo Mobile 6 Shooting modes
Advanced functions of this device may be complicated to use if you do not spend enough time learning them. I was expecting some easier user adoption, but knowing how it works and how to use it effectively takes time, probably because it is my first device of the kind, and I need to be more patient. I expected a user experience similar to the new DJI Mini Pro 3.
DJI Osmo Mobile 6 is so rich in options that I spent almost two months learning and practicing, and sometimes I still don’t know how to do something.
In the beginning, it is worth mentioning all potential operating modes. So we have four of them.
- Upright Mode: This is the primary, most general mode; you do not have to do anything special in this mode; press the trigger twice to recenter your phone. This is the mode I was using for the first period of learning DJI Osmo Mobile 6
- Side Grip Mode: To enter this mode, rotate the device to the left or right by 90 degrees and press the trigger twice to recenter the phone. I do not use this mode often because I can’t find proper usage.
- Low position Mode: This mode is challenging for me. It would be best if you used it to shoot low angle. It requires extending the rod and adjusting the gimbal angle vs. the rod. You should keep your handle horizontally while your phone is positioned vertically.
- Underslung Mode: another mode I do not use very often. To enter it, turn your gimbal upside down and press the trigger twice to check your phone. It can help shoot moving objects from a low angle.
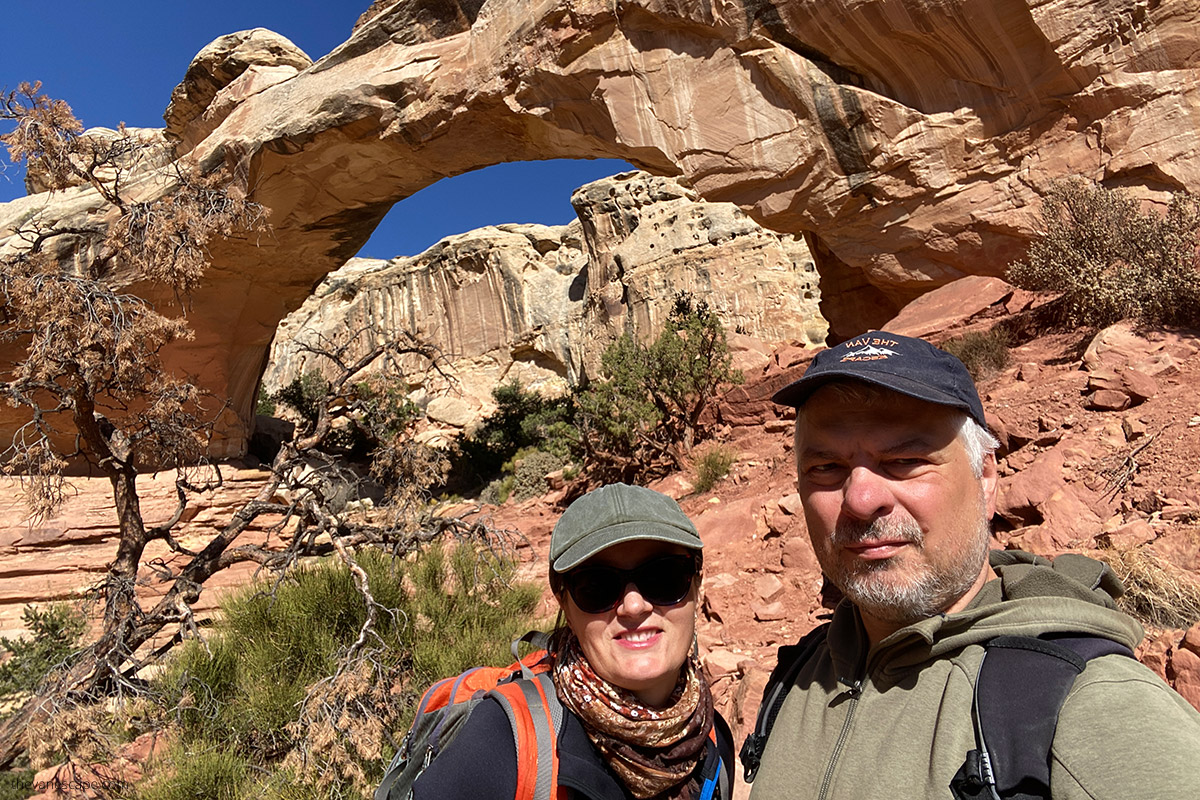
The photo below is our selfie taken using this gimbal stabilizer during the Hickam Bridge Hike in Capitol Reef. Finally, we have a good perspective. We enjoy this feature of DJI Osmo Mobile 6.
Later things got even more complicated because we had another group of four modes: tilt locked, FPV, spinshot, and follow. Let’s understand what each of them is doing and when to use those.
- Follow mode: both the pan and tilt axes follow the movement of the grip. Suitable for scenarios when moving up or down or on a slant
- Tilt Locked: only the pan axis follows the movement of the grip. You can use it in scenarios like arc shots or moving left to right.
- FPV: all axes follow the movement of the grip. Best for shooting first-person view.
- Spinshot: is not a useful mode where you can shoot while the camera rotates 360 degrees. It may be handy for some special effects.
And no, this is not over. DJI complicated it even more with DJI Mimo App modes. I will explain them in the next chapter.
But before you read on, we want to show off our first-ever video shot with the Smartphone Gimbal Stabilizer. Please look to see the smoothness of the recording with the stabilizer.
Mimo App
DJI Mimo App is a critical component of the gimbal. Of course, you can use the stick itself without the app, but in such a case, you lose a lot of features the app offers. The most important and most often used features are calibration and Academy.
The first one I already explained, but the second one is important to shorten your learning curve. In the app, you have links to tutorials and manuals that help to understand how the device works and how to get used to all the features. You will learn how to improve your videos using the features properly.
In the app, you also have AI Editor that can help you to compose final videos and publish them rapidly. Of course, you also have a regular manual Editor if you don’t like AI. But I want to focus on a completely different thing – more modes that make using the gimbal even more complicated. Let’s list them and understand why they are helpful:
- Hyperlapse: this mode lets you shoot a timelapse photo while moving the mobile phone
- Timelapse: this mode has some options (Fixed Angle, L to R, R to L, and Custom Motion). You must also set interval and duration. In the case of custom motion, you define up to four positions that the gimbal will follow.
- DynamicZoom: simple move-in/move-out shooting mode for selected subject
- Slow Motion: this is my favorite mode. You can shoot video 4x or 8x slow-motion – mobile phones must be compatible to work correctly.
- Video: regular video shooting
- Photos: regular photo shooting, hold for burst photo
- Pano: in this mode, you can take a nice panorama consisting of 3 to 9 photos taken separately – it can be 3×3, 240degrees, or CloneMe mode.
- Story: this mode provides you with templates for recording video
I want to emphasize the most interesting DJI Osmo Slow Motion mode. You can check if your phone is compatible with this mode on the official list. All modern iPhones support this mode, but it is not so obvious with Android devices.
If you want to purchase DJI Osmo Mobile 6, it’s better if you have iPhone.
Another thing is that you must know that max resolution in slow motion is 1080p for iPhones and not even that high for most Android devices.
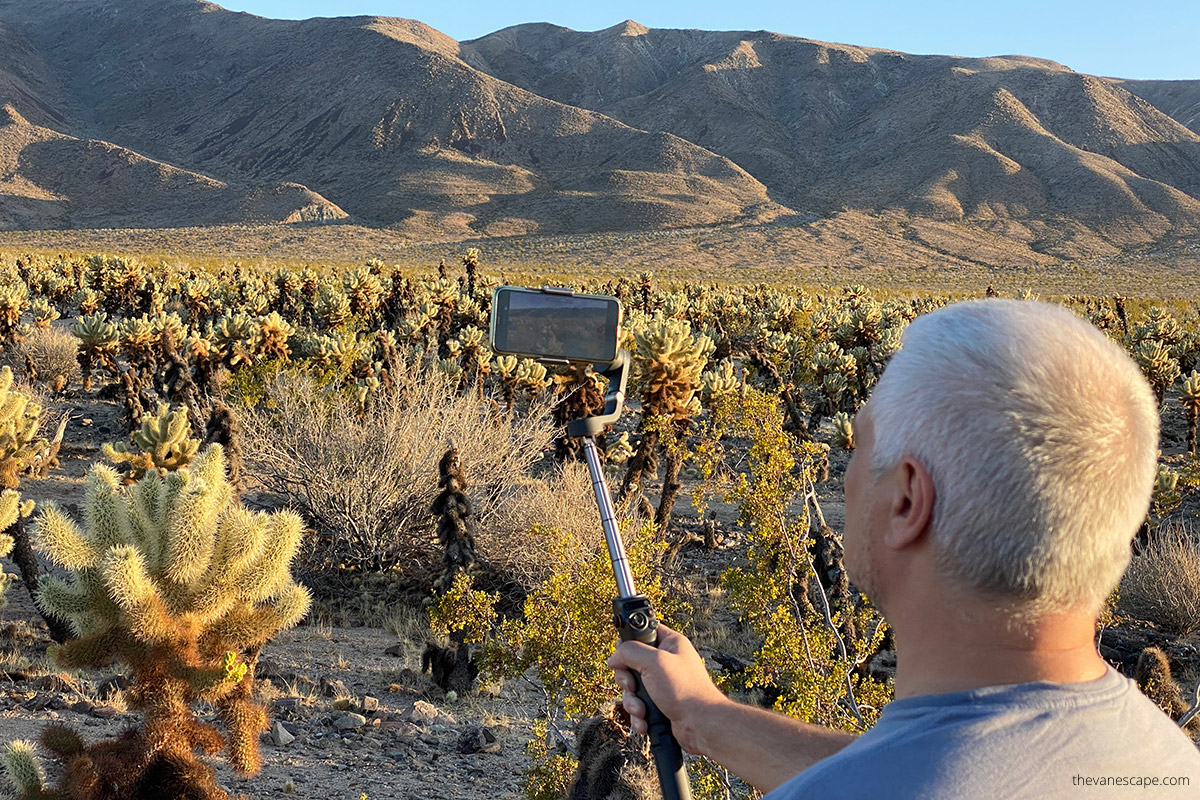
And here’s a photo of Chris and his new gimbal stabilizer before he stepped on a cactus, and the spines got stuck in his foot, but that’s another story 😉

ActiveTrack 5.0
In my opinion, this feature is the most valuable of all DJI Osmo Mobile 6 offers. It allows me to record professional-grade videos with perfect subject follow. Without this feature registering this kind of video requires a lot of experience from the owner.
Active Track 5.0 do the job for you, and I love it. If you own other DJI products like drones, and you combine videos recorded with Active Track intelligently, you can produce fantastic videos.
So how do you use Active Track 5.0? Just drag a box on the screen around your subject, and if it lits green, it means the feature is active. To stop it, touch the x sign in the corner. Yes, this is so simple, and again – I love it.
You can also use gestures to start and stop recording what is good if you are shooting yourself from the gimbal on the tripod.
The photos below were taken in New Mexico. We dreamed of flying a drone there, but that’s prohibited in wilderness areas, so we took some videos with a smartphone and a stabilizer. You can find videos of these strange landscapes in our articles: Alien Throne and Bisti Badlands.
DJI Osmo Mobile 6 Accessories
You do not need too many accessories to use DIJ Osmo Mobile 6 effectively. But one thing is worth mentioning. Especially if you are working in a studio, it’s essential to have good lighting. And this gimbal is well prepared to support additional light sources for best shots. It also supports external mic attachment.
DJI OM Fill Light
DJI OM Fill Light Phone Clamp is designed for low-light shooting and is magnetic for easy mounting. The built-in LED auxiliary lights provide three brightness levels and three color temperature options, letting you highlight subjects with excellent lighting wherever you go.
DJI Mic
If you want to improve the audio quality to match your video content, add DJI Mic to your set. This mic is the first dual-channel wireless microphone system, consisting of two transmitter microphones, a receiver, and an ultra-portable charging case. It offers excellent recording performance to capture the authentic sound that perfectly matches your DJI Osmo Mobile 6 videos.
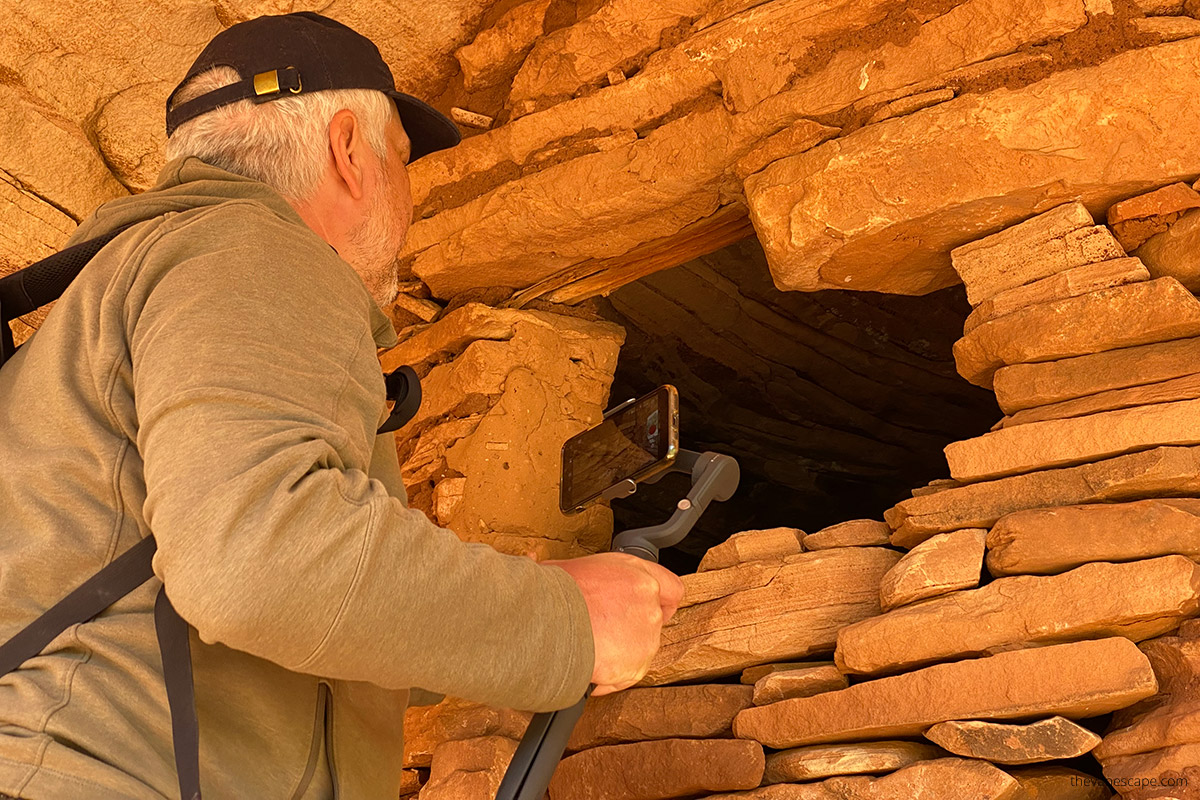
Below, Chris makes a short video using the DJI Osmo Mobile 6 in Natural Bridges National Monument in Utah.

Who is DJI Osmo Mobile 6 for?
After these few months of use, I would like to know if DJI Osmo Mobile 6 is for me. And who exactly is it for?
On the one hand, it is small and can be easily packed and used where we need the functions it offers. On the other hand, its operation is complicated and requires a burden to ensure that the recorded material has a good quality.
Indeed, the advantage is that we can use the phone to record video material, which reduces costs. But also, using the phone carries the risk of someone calling during the recording, and we have to do the job from the beginning. It may be better to have a dedicated phone for recording, but isn’t it better to buy a dedicated camera with a built-in gimbal, such as Go Pro? We leave these thoughts to individual decisions.
Below, Chris makes a short video using the gimbal DJI Osmo Mobile 6 at Bears Ears National Monument in Utah.

Pros and Cons of DJI Osmo Mobile 6
DJI Osmo Mobile 6 Pros
DJI Osmo Mobile 6 Cons
DJI Osmo Mobile 6 Review – Summary and the Verdict
It is time to summarize this short review. And because this is not a sponsored post, I will be honest with you as always. I like DJI Osmo Mobile 6, but only in some aspects. Why?
First, it offers many features, and I do not use even half of them – probably because I am not a professional videographer, so I do not blame DJI for it. I blame myself. And even if I like some features, they are challenging to use. Of course, after time, I know how to use but as I said before learning curve is time-consuming.
Second, the requirement to use a phone is again good and not good. I still do not like it because I can’t use my phone for other things while recording, and second, this set requires permanent calibration to keep the horizon even. I hate this process. Maybe I should browse the DJI Osmo forum to find a solution. I never tried it.
But finally, I love Active Track 5.0. I can’t imagine recording so good videos with another tool. It’s easy to use, and you do not need any experience to use this feature. This is something that convinced me to buy DJI Osmo Mobile 6. Big advantage. Good job, DJI.
Another advantage is the app and usage – if you have more DJI products, operating them is similar, so if you are familiar with one, it’s easier to adapt to others. I like this ecosystem. And ergonomy is rather good.
I was trying to reflect my subjective opinion in rank below – it’s not as high as I would like it to be, but at least it is what I think about it.
Despite some shortcomings, we’re glad this gimbal has been added to our photo and travel gear collection, as we plan to continue using it. It’s a valuable travel tool that we recommend to anyone who wants to capture a short video of the places they visit.