Rattlesnake Arches Hiking Guide
Rattlesnake Arches Trail is a hidden gem of western Colorado. Rattlesnake Canyon contains the second-largest concentration of natural arches in the country. If you like adventurous hikes, you can’t miss Rattlesnake Arches Trail. How do you find the fabulous arches and prepare for this challenging desert hike and drive? How long is the hike? Where is the trailhead? Check our Ultimate Hiking Guide to Rattlesnake Arches for answers and tips.
This article may contain affiliate / compensated links. For full information, please see our disclaimer here.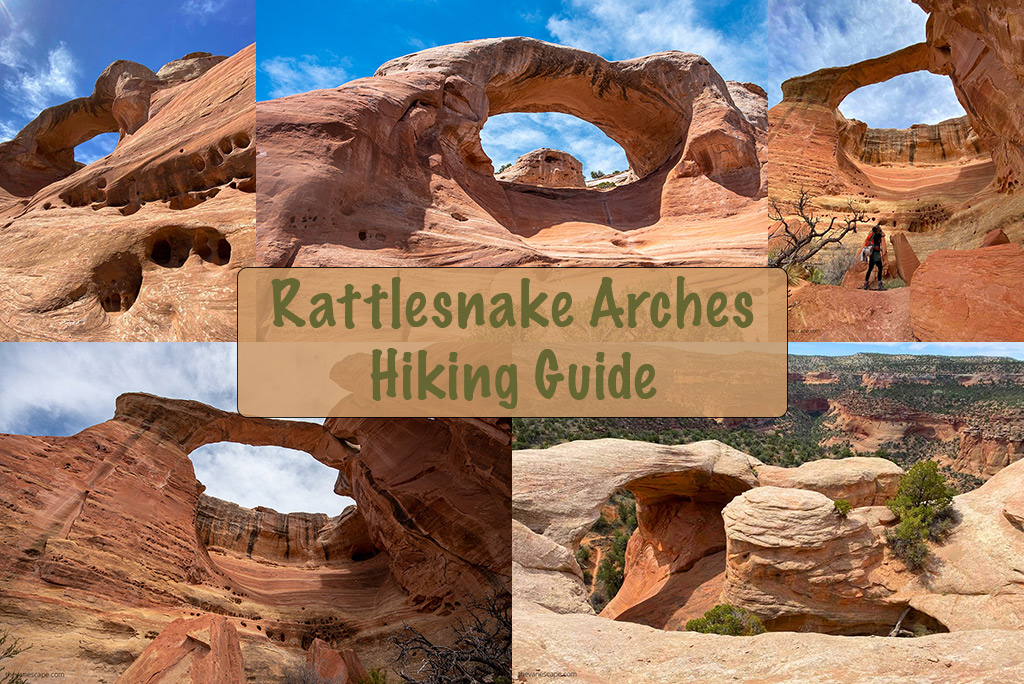
What is Rattlesnake Canyon?
Rattlesnake Canyon is a scenic area in west-central Colorado, near Grand Junction and Fruita. Is next to Colorado National Monument. Rattlesnake Canyon is located at the Black Ridge Canyons Wilderness, part of the McInnis Canyons National Conservation Area.
The entire McInnis Canyons Conservation Area, which spans over 122,000 acres, is managed by the Bureau of Land Management. 75,550 acres of wilderness are designated as the Black Ridge Canyons Wilderness.
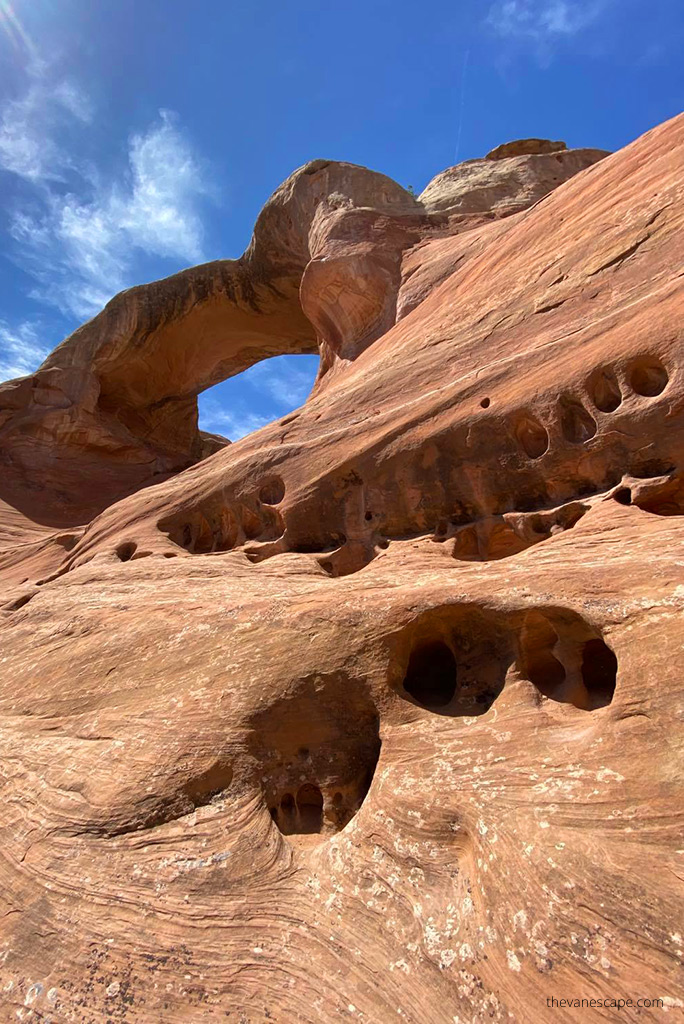
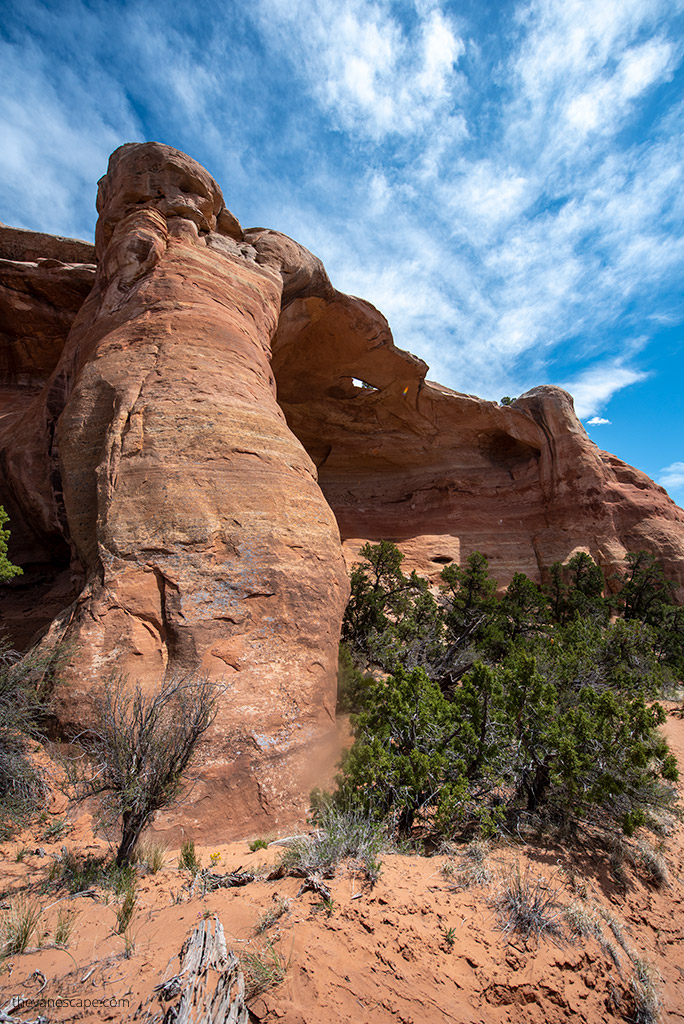
It is special because it contains the second-largest concentration of natural arches in the United States, after the famous Arches National Park in Utah. The landscape of Rattlesnakes Canyon is remarkable.
The Rattlesnake Arches are off the beaten path, but when you get there, you will truly be amazed and delighted by nature’s wonders. It is definitely worth adding this place to your Colorado Itinerary.
It wasn’t easy to get there because the road is difficult, and the trail is demanding, but we made it. Chris and I spent the entire day in this area, marveling at the incredible rock arches shaped by Mother Nature. We took many photos to present to you because the place is extremely photogenic. So, be sure to take a camera with a wide angle. But first, check out our first-hand tips on how to get there because it’s easy to get lost.
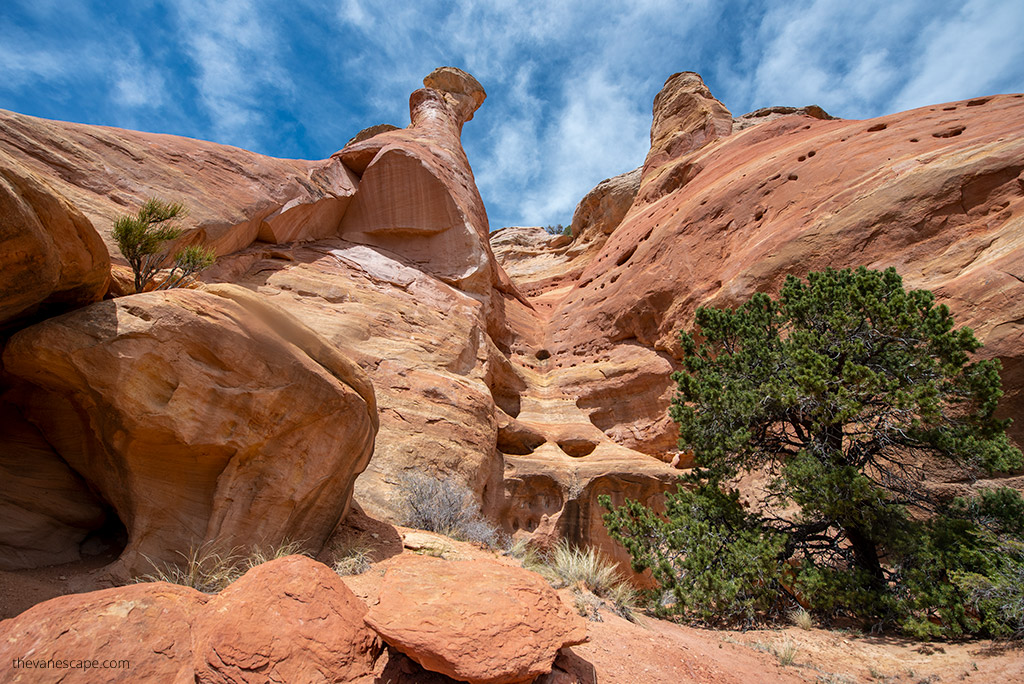
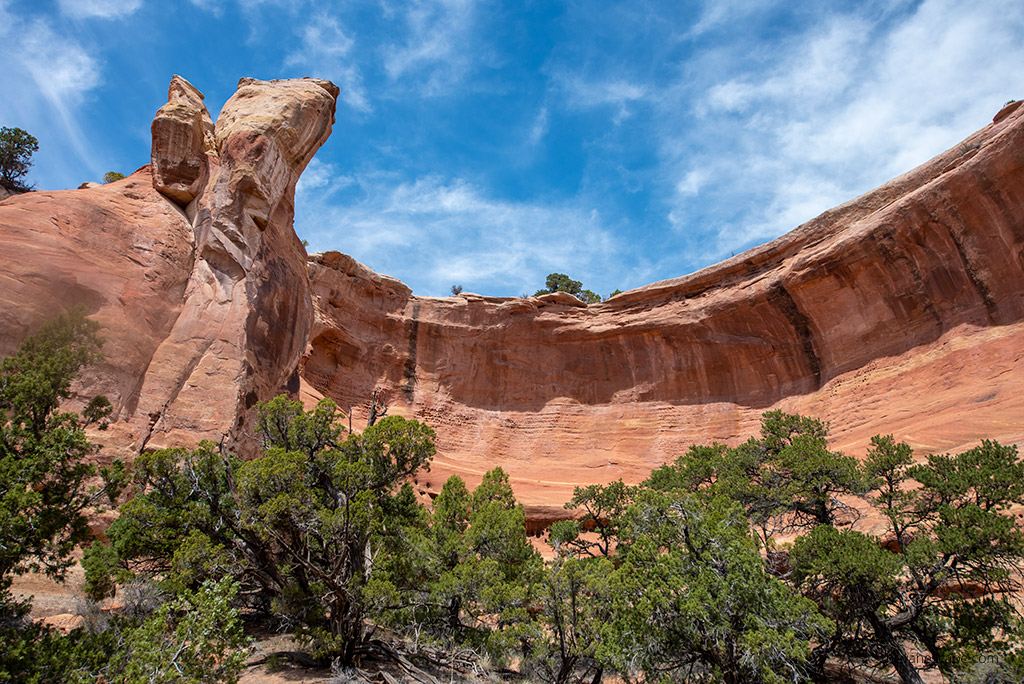
Rattlesnake Arches in the Canyon
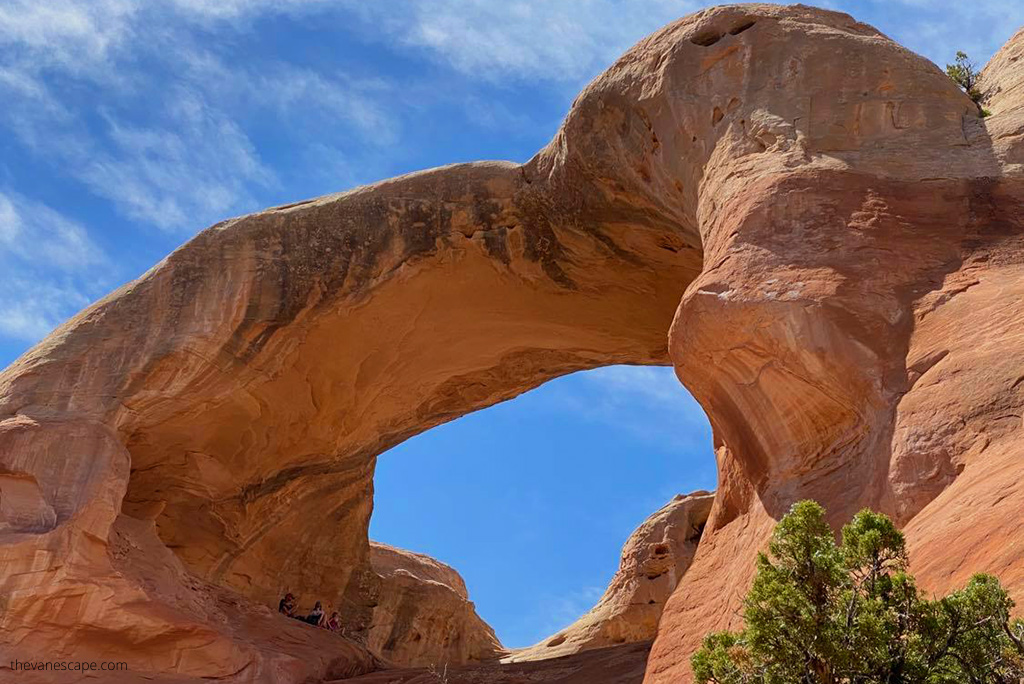
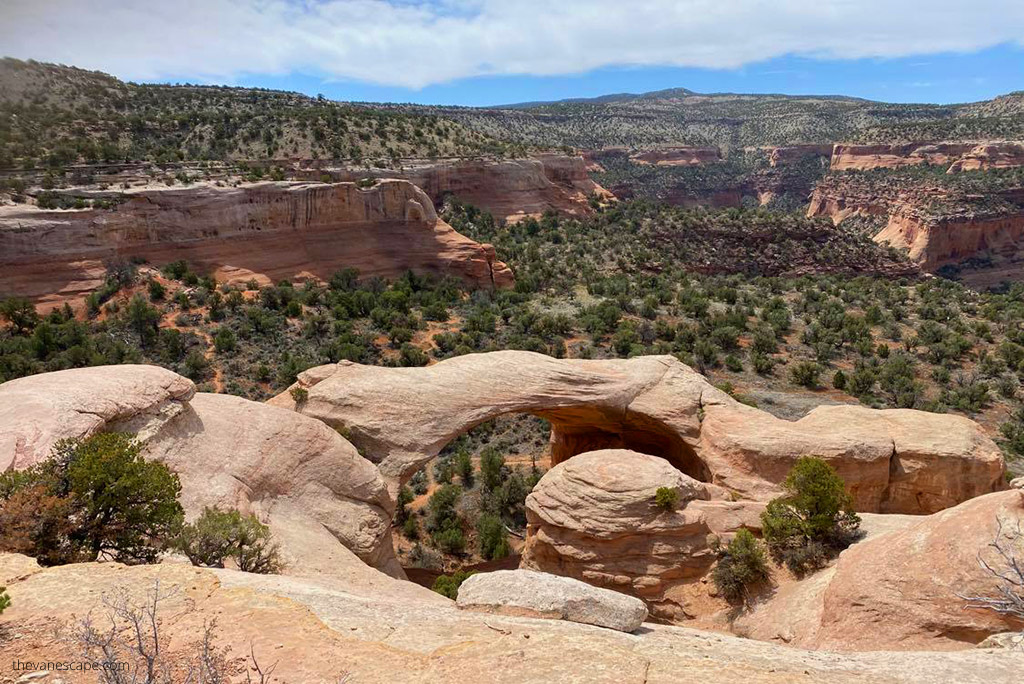
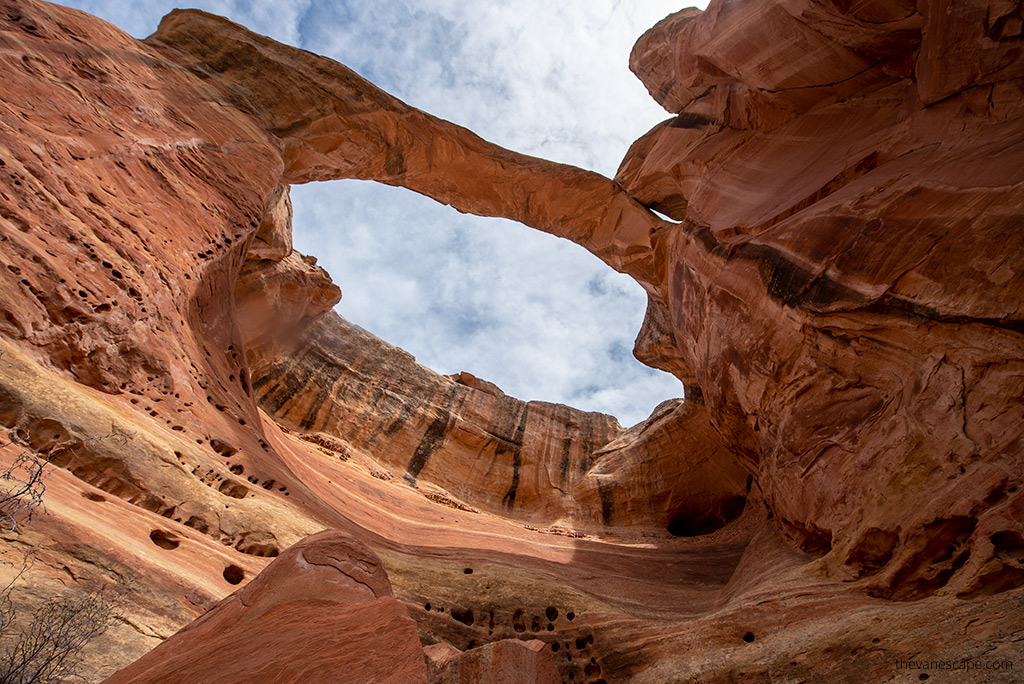
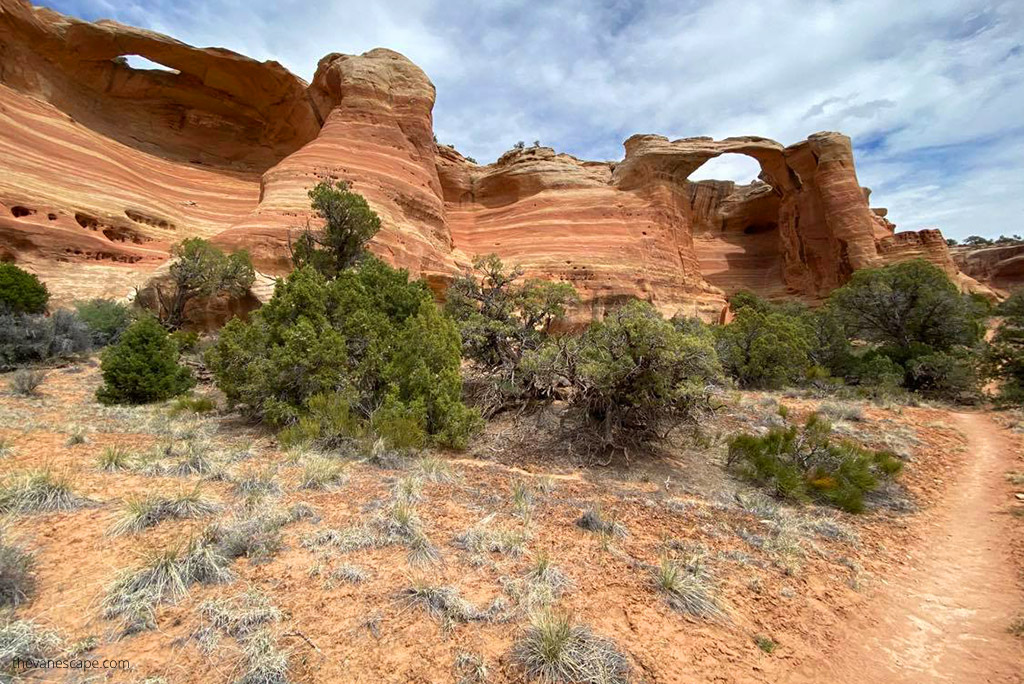
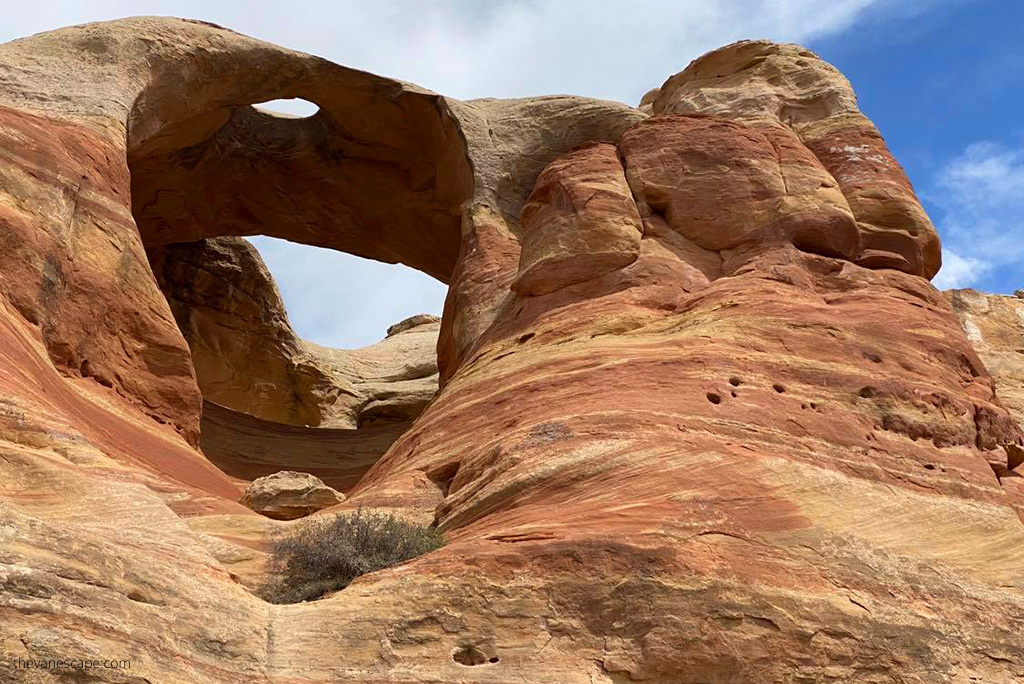
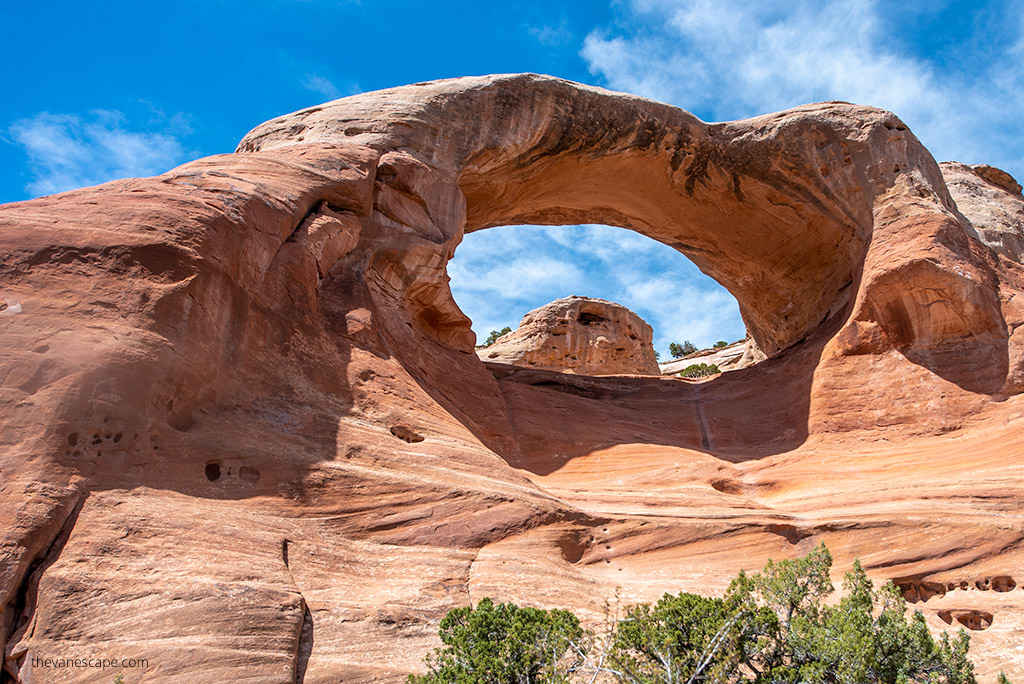
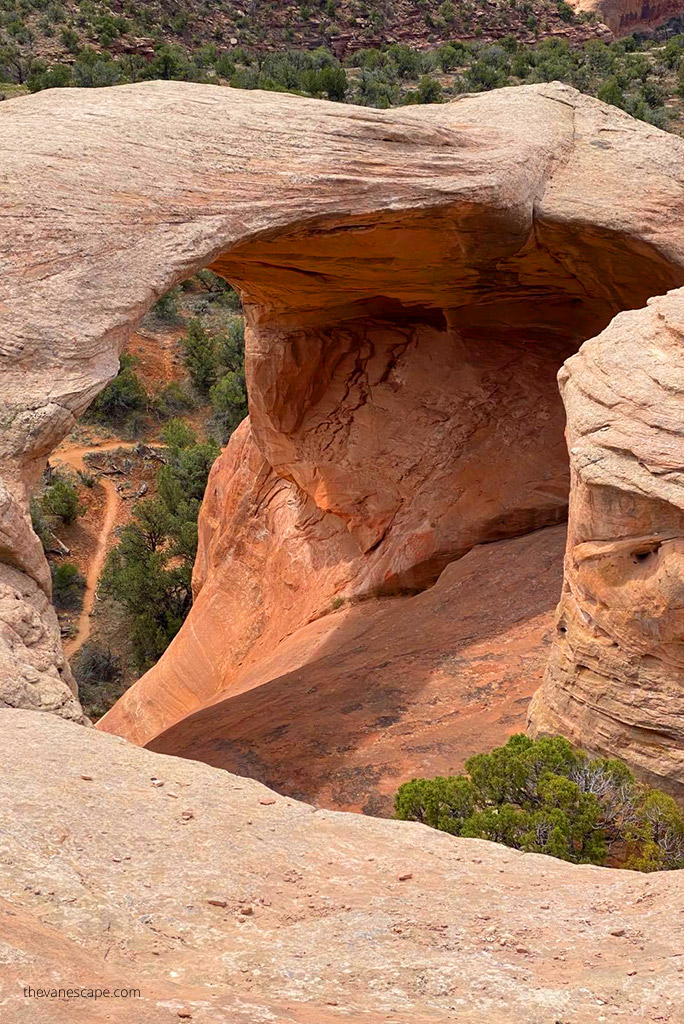
There are nine Rattlesnake Arches in the Canyon. But during Rattlesnake Arches Trail, you can admire seven of them. The most impressive Rattlesnake Arches are:
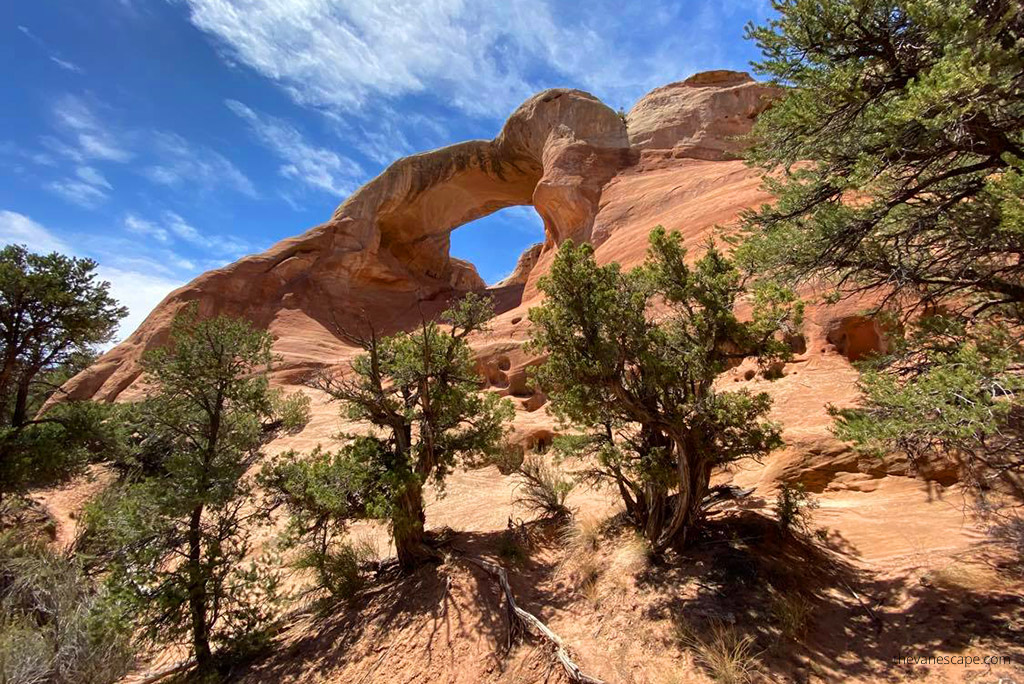
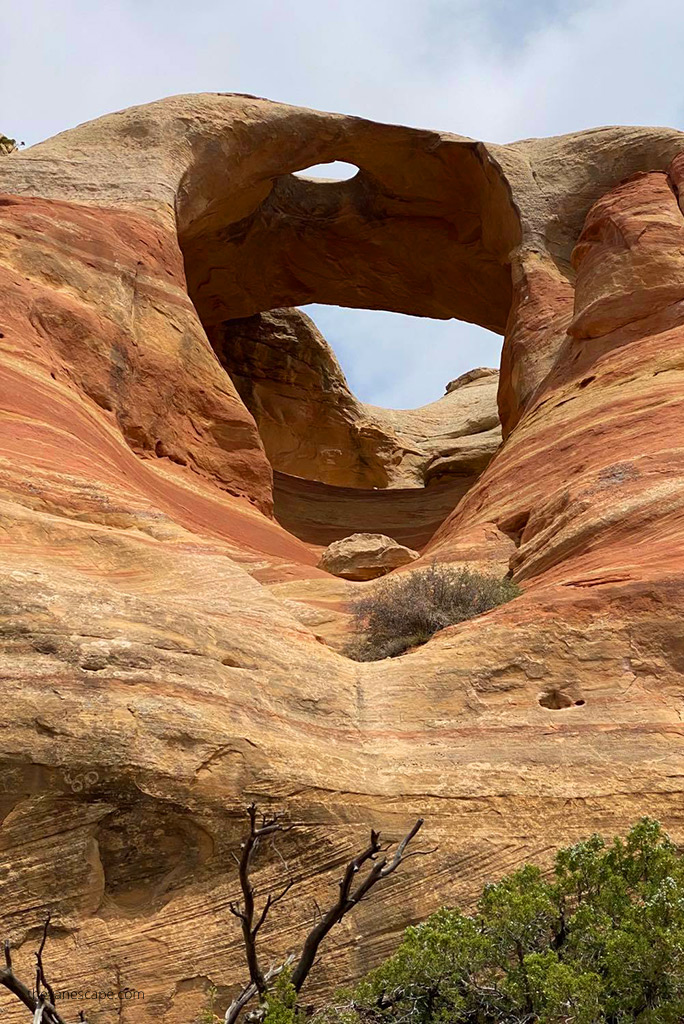
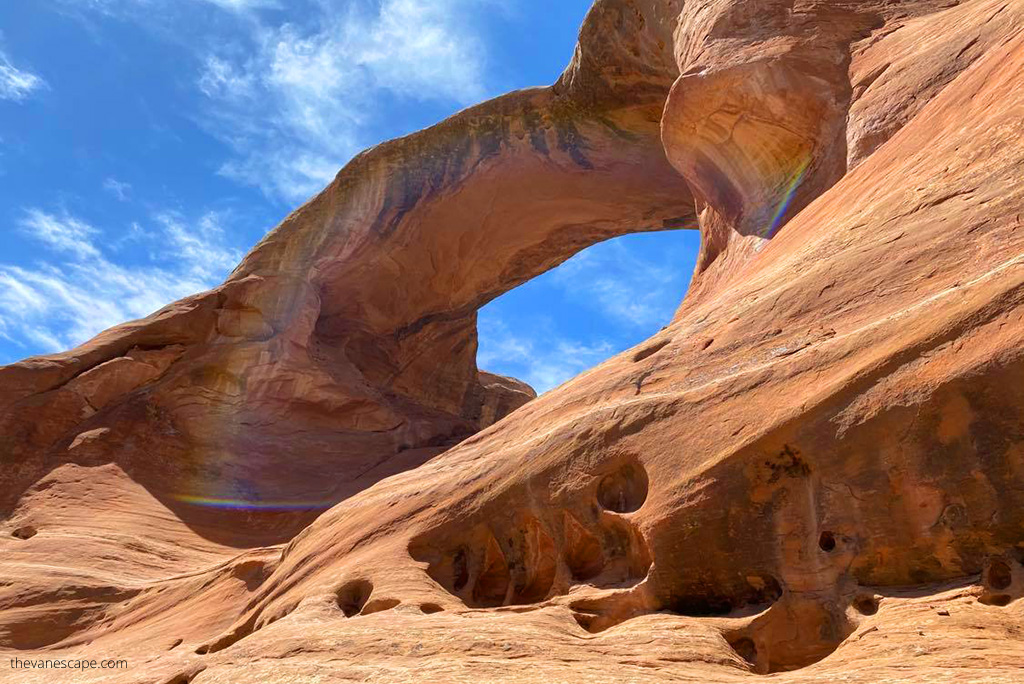
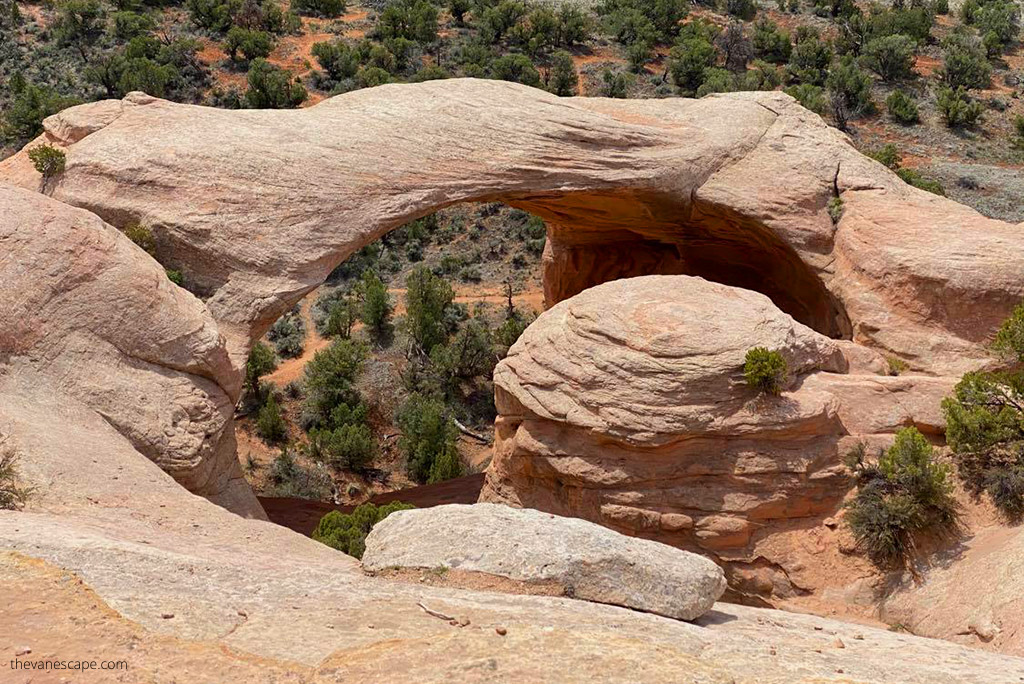
- Cedar Tree Arch with a span of 76 feet and an opening height of 43 feet. It’s also known as Rainbow Arch.
- East Rim Arch has a span of 40 feet and an opening height of 120 feet. Moreover is also known as Akiti Arch or Centennial Arch.
- Bridge Arch, also known as Hole-in-the-Bridge Arch. It has a span of 40 feet and an opening height of 30 feet.
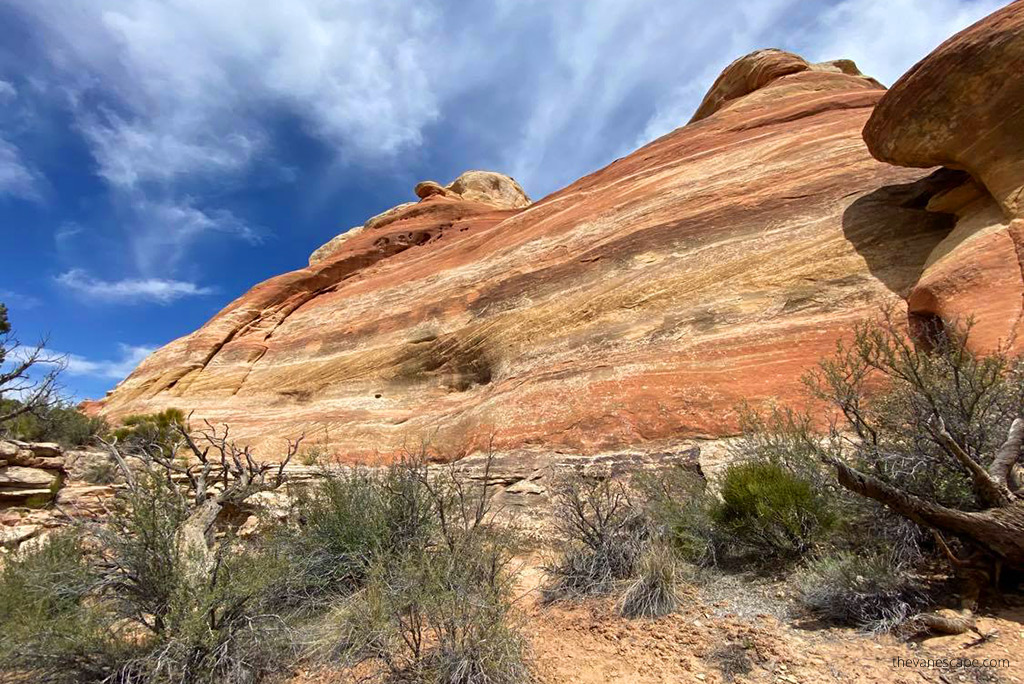
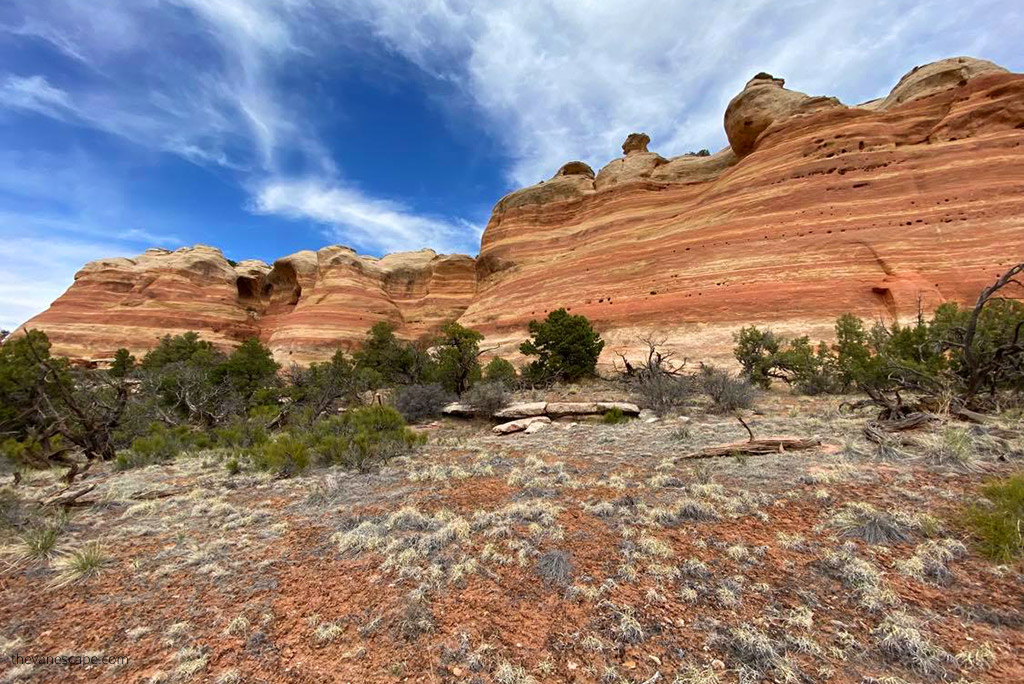
Geologic features in this area also include spires, windows, giant alcoves, and a desert patina. Between these canyons are pinon-juniper-and sagebrush-covered mesas that slope downward to the Colorado River.
The area provides a habitat for wildlife, including deer, mountain lions, bighorn sheep, and bald and golden eagles.
Extensive Rattlesnake and Mee Canyon and majestic uplands offer spectacular scenery and solitude. Rattlesnake Arches trail is one of the best hikes in Colorado. It’s worth your effort and adding to your Colorado itinerary.
How to get to Rattlesnake Arches?
It’s not easy to get there. Rattlesnake Canyon is a remote wilderness. The hike itself is moderate to strenuous and is long. However, getting to the trailhead is challenging, and it’s an adventure in itself.
Access to the Rattlesnake Canyon is either by:
- a strenuous seven-mile one-way hike from the Pollack Bench trailhead,
- or by the Black Ridge access roads, which offer a shorter hike, but a challenging drive.
You can get to Black Ridge roads via the Colorado National Monument. These dirt roads are open seasonally. You can get there only with the high ground clearance four-wheel-drive vehicle and only under dry conditions. But most of all you need an off-road experience to get there safely.
Moreover, two roads and two trails lead to Rattlesnake Arches. Below you will find a detailed description and tips for both of them. So, you can choose which option is better for you, a longer hike from the Pollack Bench trailhead. Or maybe hike via Black Ridge roads.
Regardless of which variant you choose, please read all our desert hiking tips below because it is a demanding hike in remote terrain. It’s a hike for the whole day. You have to prepare for the Rattlesnake Canyon Arches trail properly. So, plan ahead and prepare. This remote and rugged area contains few amenities.
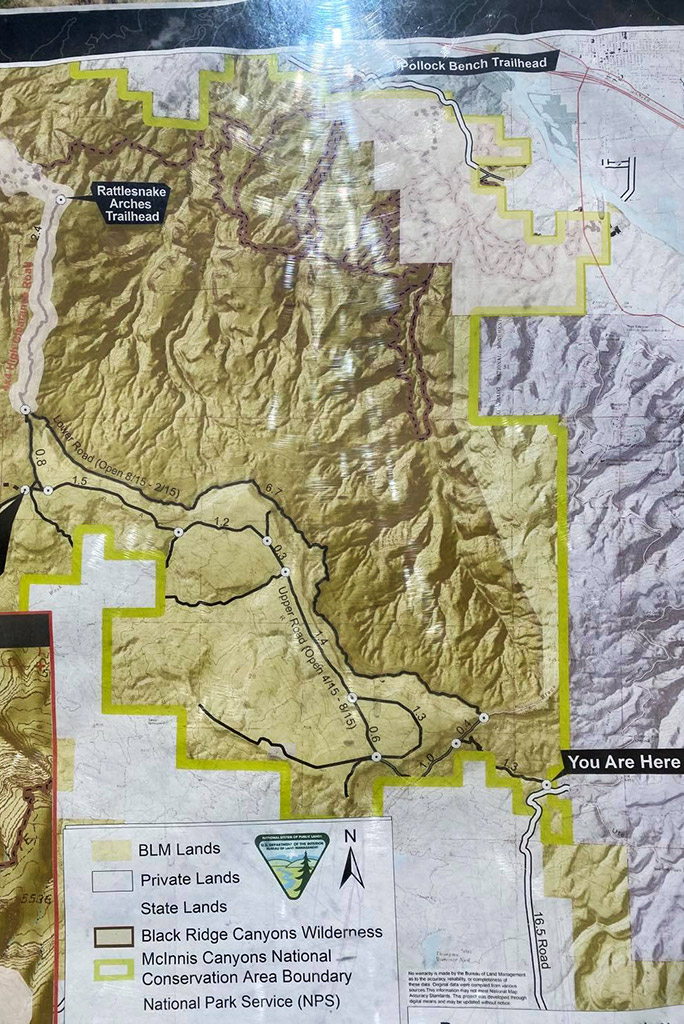
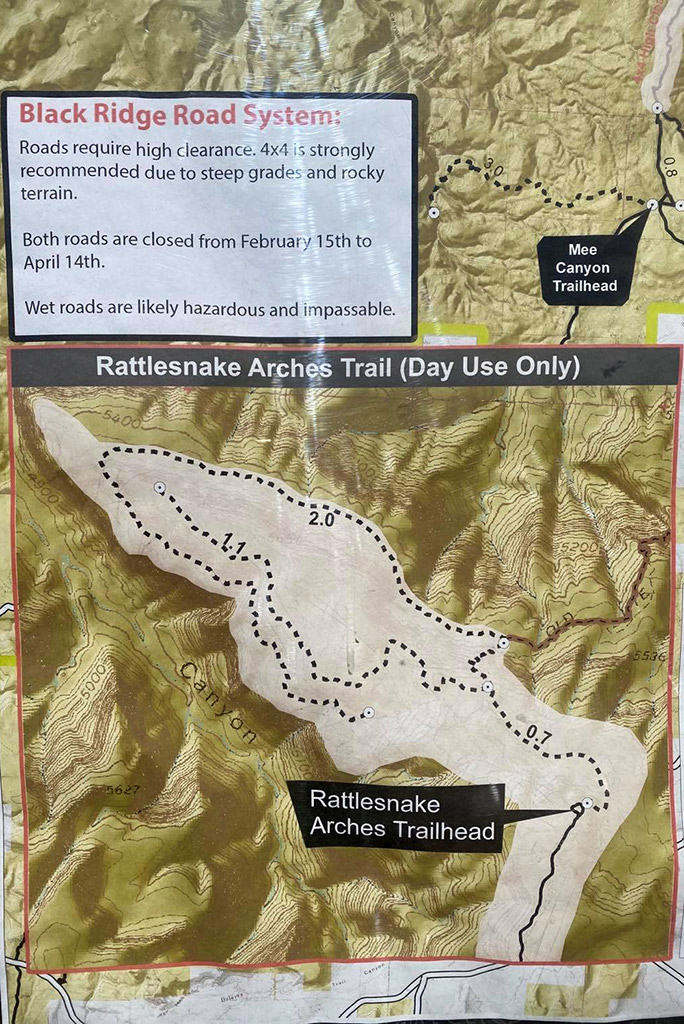
Pack a map. McInnis Canyons National Conservation Area with Rattlesnake Canyon is adjacent to the Colorado National Monument. Therefore,on this map, you will find the area and the trail to Rattlesnake Arches.

Rattlesnake Canyon Hike Important Facts
Distance:
- Rattlesnake Canyon Arches Trail 6.2 miles round trip (but you must have a four-wheel-drive vehicle to get to trailhead)
- or via Pollock Bench Trail 14 miles round trip
Difficulty: moderate to strenuous
Time Required: at least 6 hours up to the whole day
When to visit Rattlesnake Canyon Arches?
The best seasons to visit this desert area are Spring and Fall when the temperatures are moderate. Summer days are sweltering, so plan your hike for early morning or evening. Summertime temperatures can exceed 100° F (37° C) with little access to shade.
Stay hydrated, and whatever season you are going to hike, please check our desert hiking tips at the end of the article. But also avoid this trail if rain is imminent.
How to get to Rattlesnake Arches Trailhead?
Option 1 Rattlesnake Arches Via Pollock Bench Trail
This is an OPTION 1 – it’s a longer hike over 14 miles roundtrip, but you DON’T NEED a 4WD to get to the trailhead. This trailhead is easily accessible from the mild dirt road running along the Colorado River. The Rattlesnake Arches Trail shares the same beginning as the Pollock Bench Trail.
It splits off to the right, almost two miles into the trail. This route is recommended for backpackers, is a perfect idea for an all-day trip or as a weekend trip with camping over the stars (but check our tips below to see camping rules in the area).
Directions to the Pollock Bench Trailhead
Pollock Bench Trail, Rattlesnake Arches Trail, and Flume Canyon trail begin at the Pollock Bench Trailhead. To access the Pollock Bench Trailhead from Grand Junction, travel west on I-70 to the Fruita exit. Then take a left and travel about 1,5 miles to Kingsview Estate.
Take a right and drive through the subdivision. Head left when the road turns to gravel. You will pass the Devils Canyon trailhead on your left. The Pollock Bench Trailhead is located at a parking area about 3,5 miles in on the left side. The parking is free. There is no hiking fee as well.
The Pollock Bench and Rattlesnake Arches Trails share the same initial route for about the first 1,6 miles. The elevation gain during the first part of the Pollock Bench Trail is difficult. In the later part, we describe the hike in detail.
Hike to Rattlesnake Arches via Pollock Bench Trailhead
From the Pollock Bench trailhead (P1), follow the signs for the P1 and R1 trails. The Rattlesnake Arches (R1) and Flume Canyon (F1) trails depart from this same trailhead. The Pollock Bench, Pollock Canyon, and Rattlesnake Arches trails share the same route for the first 1,6 miles. Then focus on the R1 route.
It is a long and strenuous hike via rock-walled canyons and scrambles over sandy slabs. After five miles, the trail reaches the Rattlesnake Canyon Arches Trail. You will have a four-mile, go-and-back hike to the arches from this point.
There is no water, no shadow, so pack a large water reservoir and a platypus platy water bottle per person. There are no water sources all the way. So, take much more than a gallon of water per person and lots of healthy snacks and electrolytes, like hydration drink mix and energy gel. Remember about sun protection.
We did this hike in April, and it was pretty hot. We used sunscreen to protect our hands and faces, we had hats. Our bodies and legs were covered with long pants and sleeves because the sun was strong. During summer is sweltering.
Check out our day hiking packing list before you hit this trail.
Option 2 Rattlesnake Arches Via Black Ridge Access Road
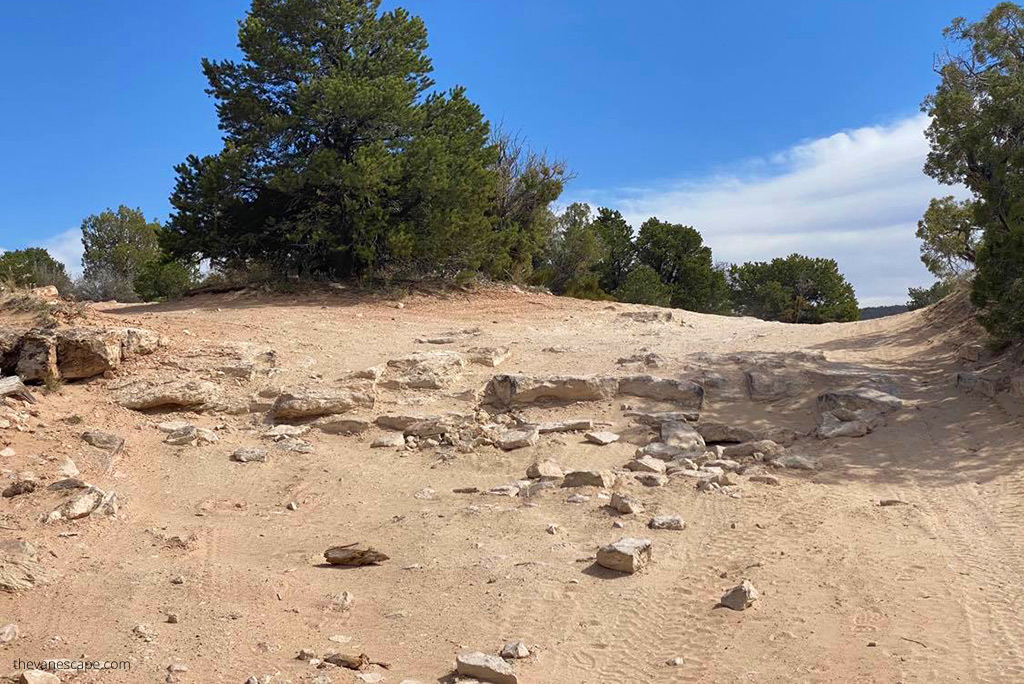
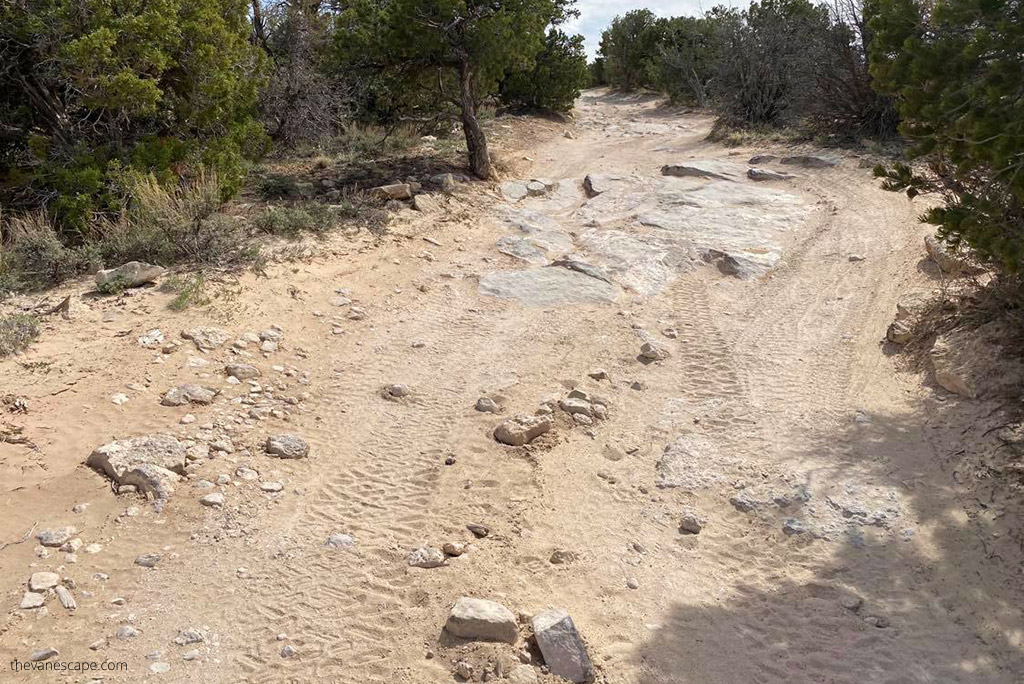
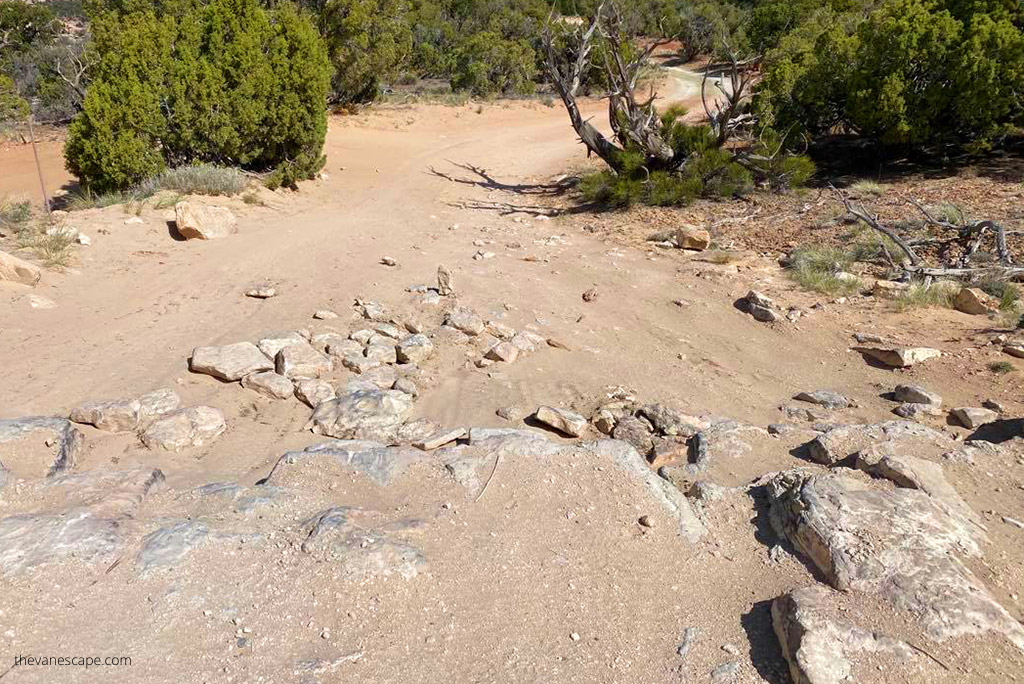
This is an OPTION 2 – it’s adventure driving to Rattlesnake Canyon Arches but a shorter hike. As we mentioned above, you MUST HAVE a four-wheel-drive vehicle with high ground clearance or an ATV. And a lot of driving experience in rocky and desert terrain. There are hundreds of sharp stones on the roads and lots of deep sand. It’s pretty easy to get stuck or cut the tire.
The 13-mile drive on Black Ridge Access Road west of Colorado National Monument takes you to the trailhead. Due to you will have a much shorter hike. If you drive via Colorado National Monument, there is a fee – of $25 unless you have an annual America the Beautiful Pass.
Directions to Rattlesnake Arches Trailhead via Black Ridge Access Road
From Grand Junction, take I-70 west to Fruita, exit 19. Take Rim Rock
Drive through the Colorado National Monument. Drive to 16.5 Road and turn right (sign for Glade Park Store turnoff).
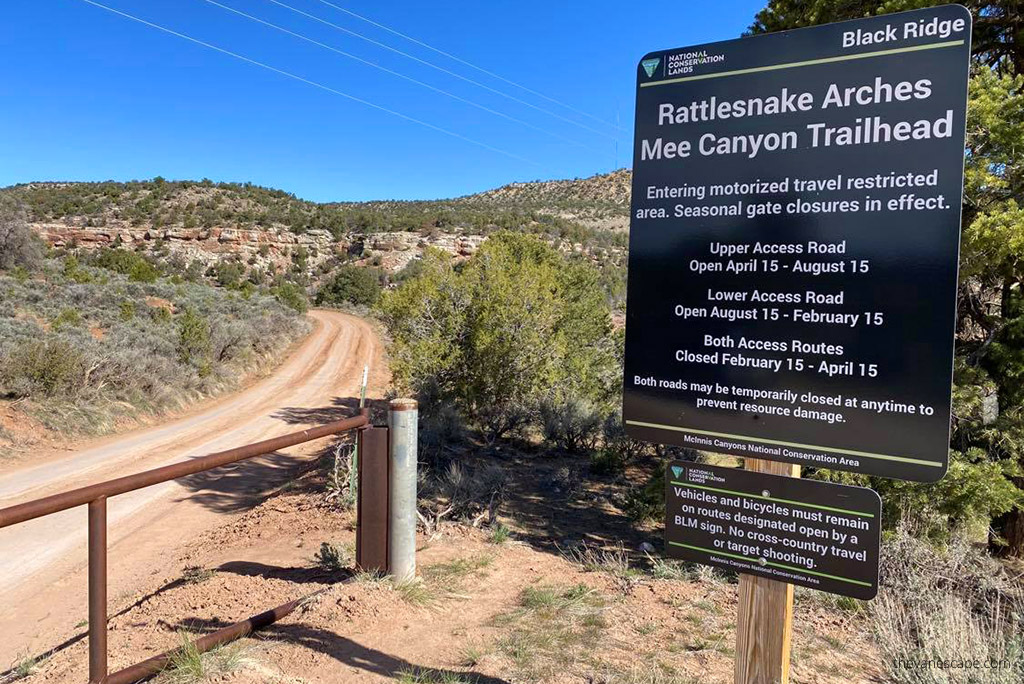
In 0.2 miles, turn right onto Black Ridge Access Road. Take the Upper or Lower Black Ridge Access Road, depending on which is open. Both meet at a “T” intersection with a kiosk. You will get to the gate to the road. It is worth stopping because you will find a board with an access map next to it.
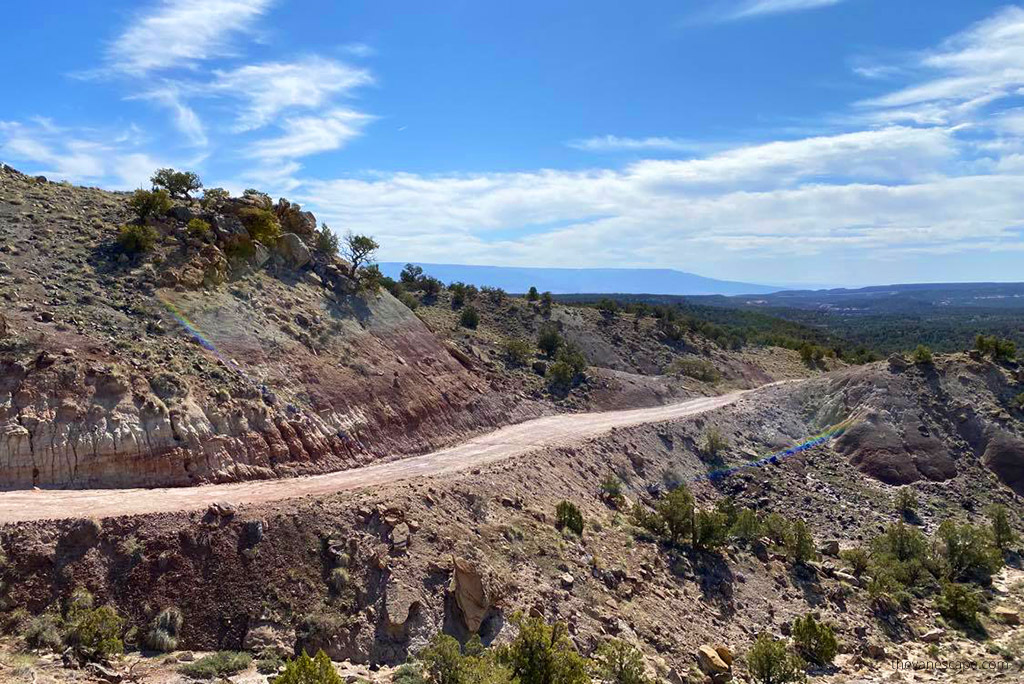
All these 13 miles long Black Ridge Access Road is challenging, but the last two miles are terrible, a rocky obstacle course with steep grades. Well, we had a car with four-wheel drive, and Chris has a huge experience with off-road driving, also in such terrain.
But we had a rented car. So, when we checked the last part of the road, we decided to park our car and make a 2-mile longer hike. The risk was too high. But below, step by step, we explain this road. It was a truly amazing adventure! This road is much worse than you can see in the photos. Before you set off on the 13-mile road, read the maps and alerts on the information board.
- First of all, the road is impassable when wet, so check the weather before your trip. You won’t get there after rain or snow. The great idea is also to visit the BLM office in Grand Junction and ask the ranger about current conditions. The address is 2815 H Road Grand Junction; phone: (970) 244-3000.
- Secondly, the Black Ridge Access Road road is open seasonably. The first section of the track is divided into the Upper Road and Lower Road. But both are open seasonally from mid-April to mid-February.
Upper Road is open from 4/15 – 8/15
Lower Road is open 8/15 – 2/15.
So, when you get to the sign, choose the proper one. Motorized travel is prohibited from February 15 – April 15 on both roads. - Third, drive with extreme caution. This road is tough. If you have any doubts as to whether you will be able to drive through, turn back. Or, park your car safely and walk to the start of the trail. There is no shame. We were worried about the rented vehicle, so we made a longer hike.
- So, it’s worth starting this trip early in the morning. Driving this 13 miles road can take about one hour or even two.
Rattlesnake Arches Trail Description
Once you have reached the parking lot safely, you can start your trek. Below we present a detailed description of the Rattlesnake Arches trail. Remember to bring a backpack with all the necessary things. Check out our suggestions on what to pack below.
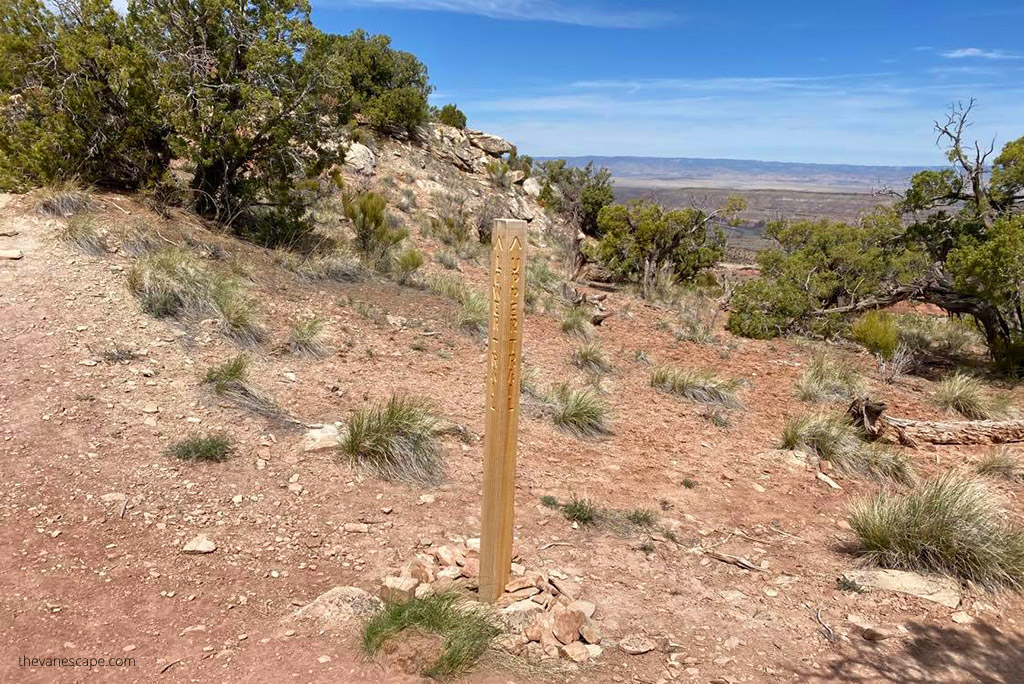
What’s important, the Rattlesnake Arches Trail is split into two sections and is not a full loop. You can hike to the top of Rainbow Arch, which is easy and short (it’s an Upper). But if you want to see all the spectacular arches, you must use the Lower Arches Trail. So, follow our tips below to have a fabulous adventure. We describe both of these parts for you.
When arriving from the parking lot, you first follow a 0,5 mile one lane to the split. You will find a post with a fork on the Upper (on the left hand), which leads you only to the top of Rainbow Arch and the Lower (on the right).
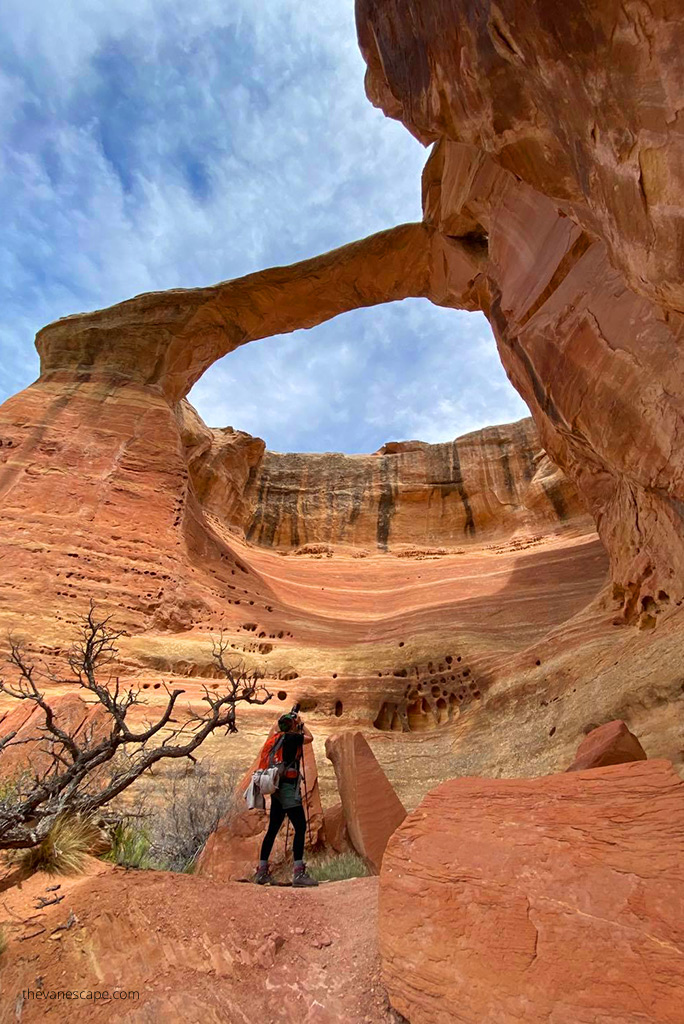
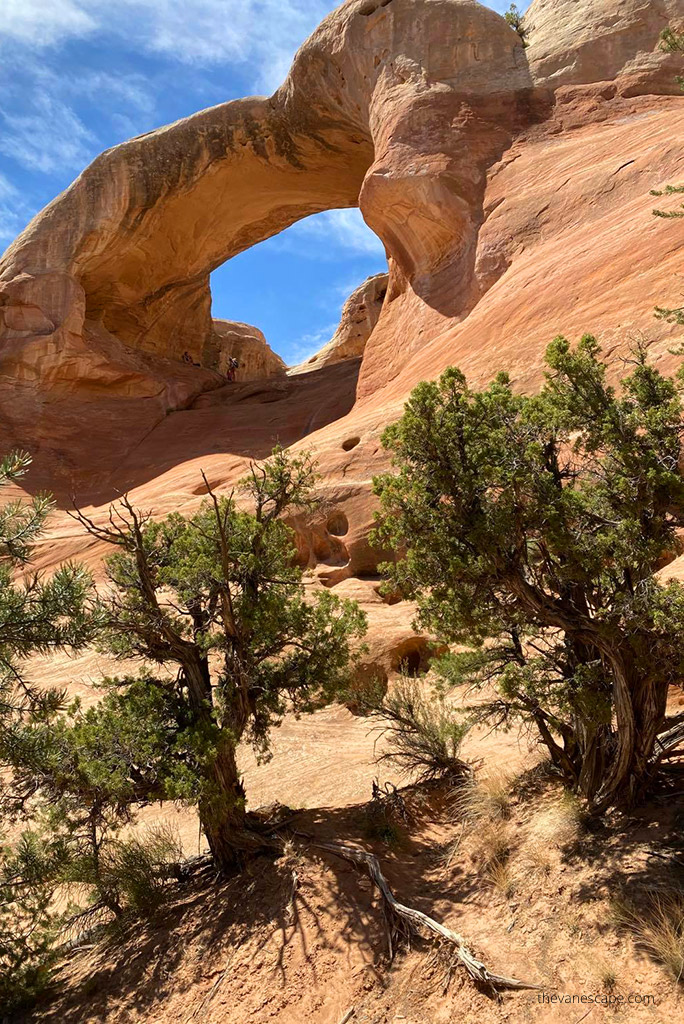
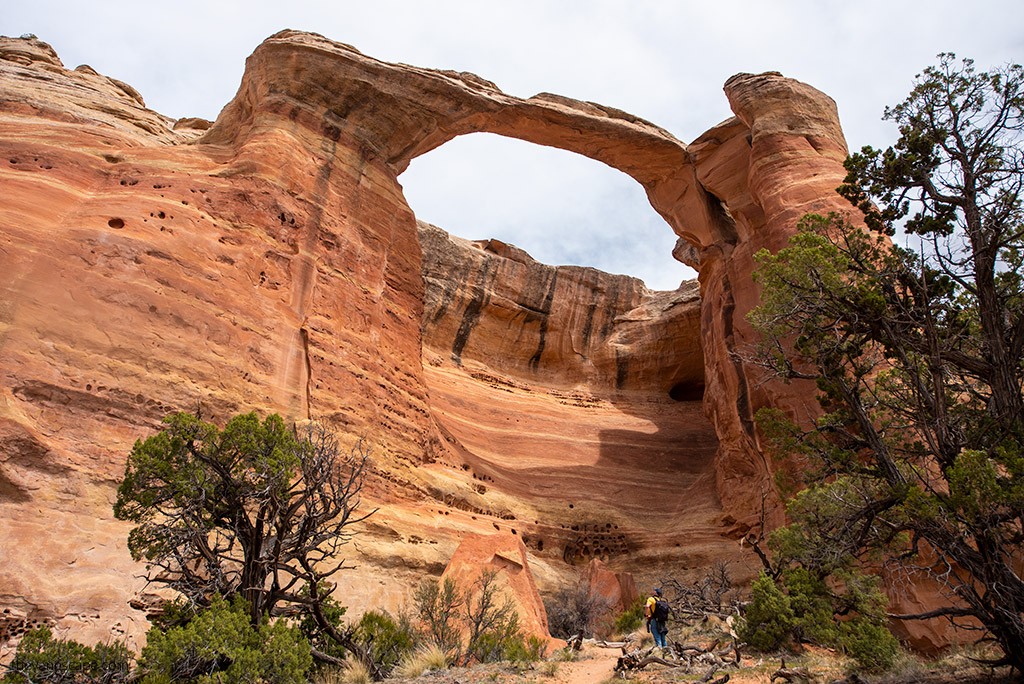
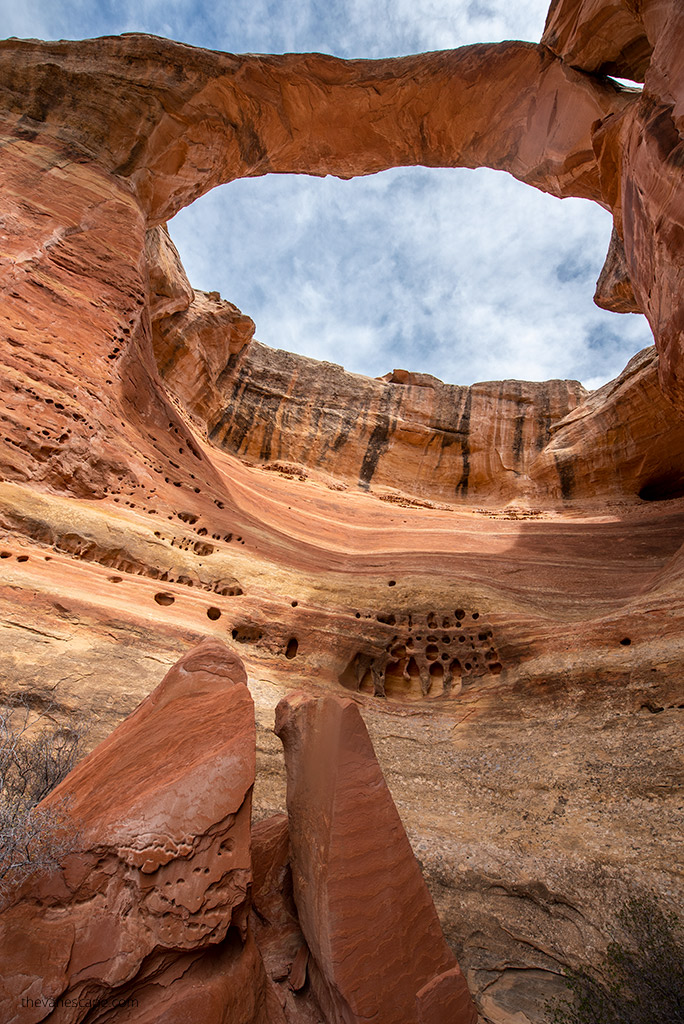
Our advice – start with the Lower part. It is longer, more demanding, and tiring. When you get back and have enough time, head to the Upper, which is much easier. Both are worth seeing, but only from the Lower Arches Trail will you see all seven of the amazing arches hidden in Rattlesnake Canyon. Only two arches are visible from the top. And the perspective is completely different.

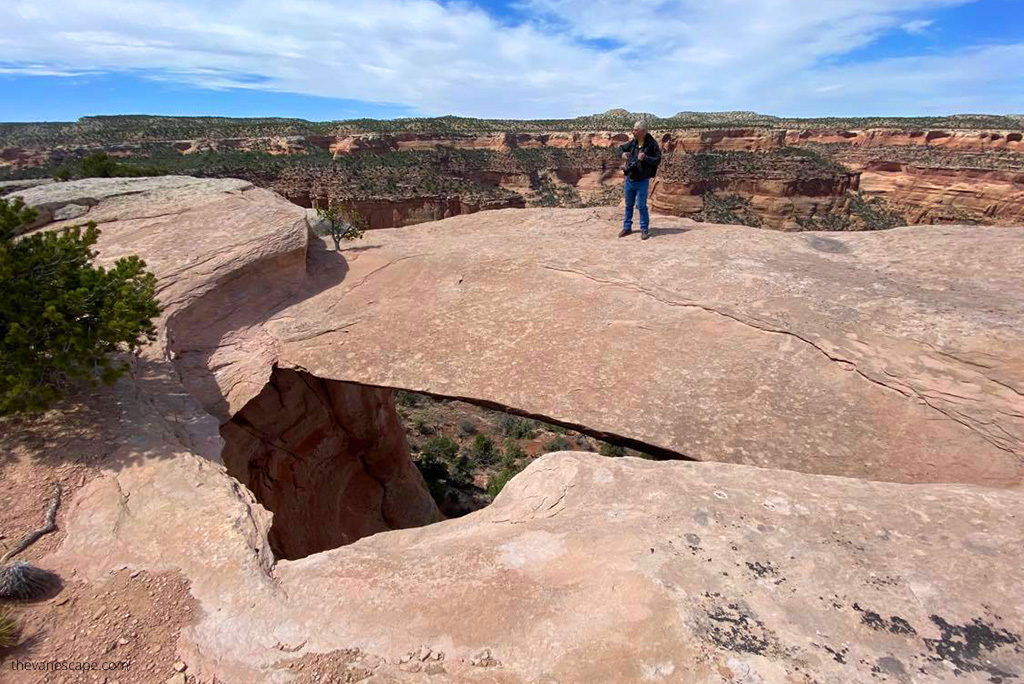
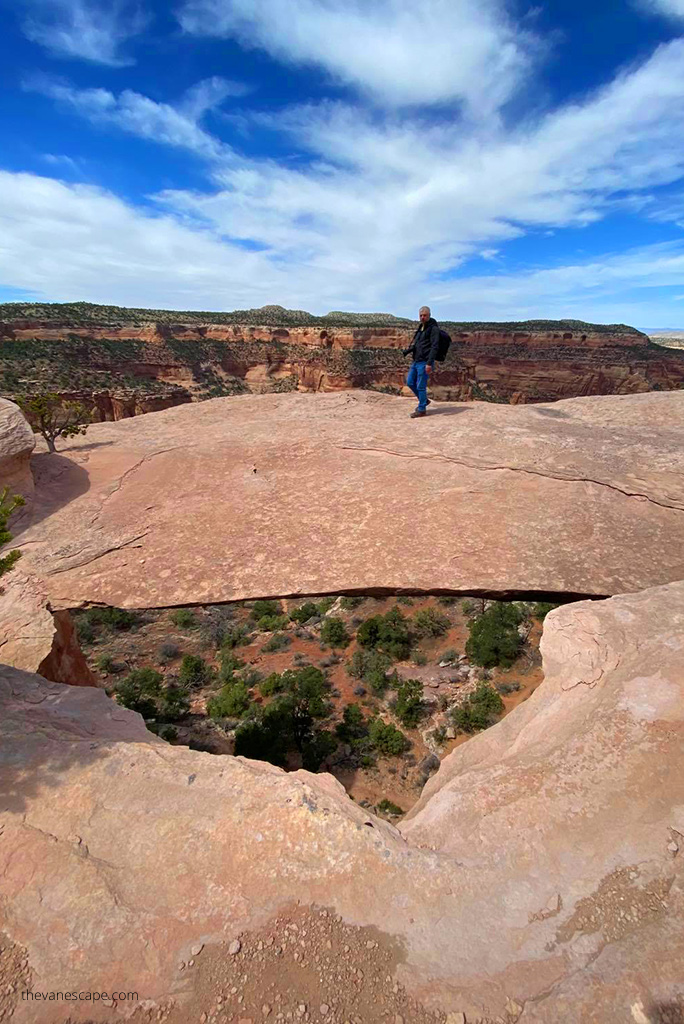
Top of Rainbow Arch
It’s an easy and short walk of 0.5 miles one way. As you will see the fork post, go to the left side. The route goes over the canyon. The views are spectacular. You will reach the top of Rainbow Arch. This is not a loop. People often go down or climb up.
But this is not an official trail, and we do not recommend this option as it is dangerous and against regulations. Admire the view and head back to the fork in the trail.
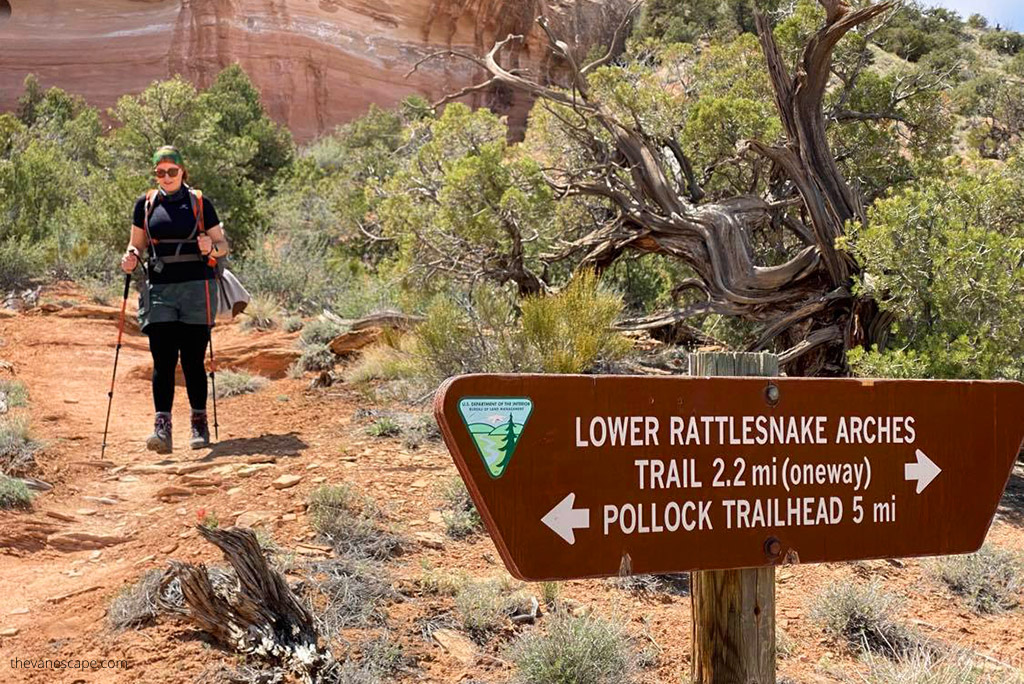
Rattlesnake Arches Trail
To see all seven arches, you must use the Lower Arches portion of the trail. To hike to the ‘Lower Arches’ trail, take the trail that descends down a steep, rocky 0.2-mile section of trail at the intersection around 0.5 miles in. You will reach a fork with a sign on it: Lower Rattlesnake Arches Trail (2,2 miles one way) and Pollock Trailhead (5 miles). Turn left at the bottom of the steep descent, following signage. This section of the trail will end at the bottom of Rainbow Arch.
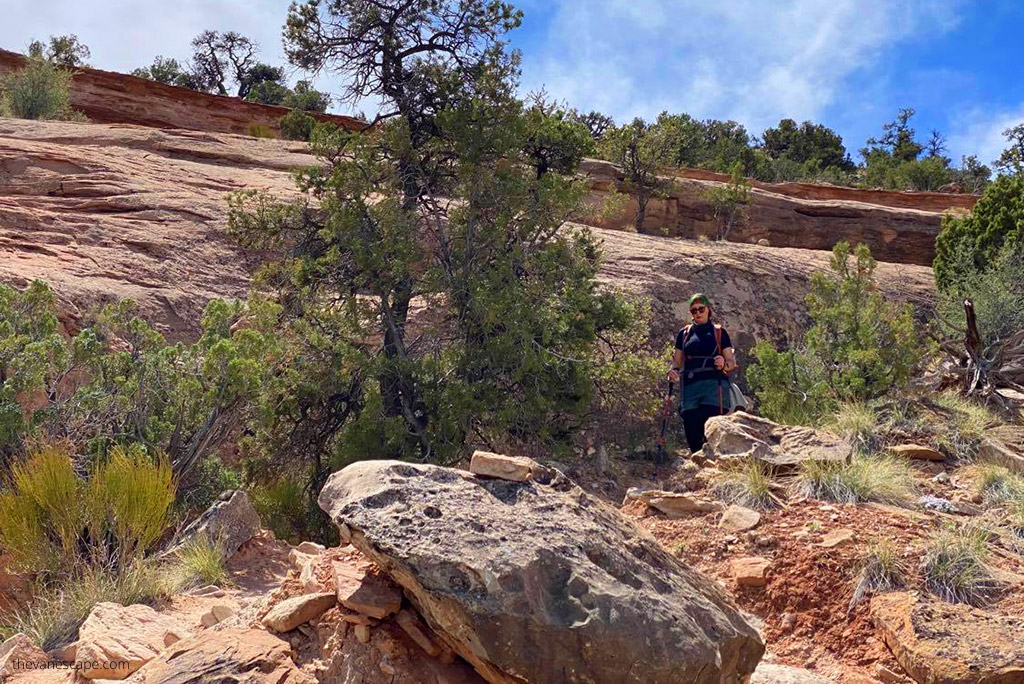
On the way, you will admire all seven arches. The road leads along amazing rocks for the first mile. When the trail turns left, arches will start. When you reach the end of the trail – turn back. You will see a sign “the end of the trail.” It’s at the bottom of the Rainbow Arch. We do not recommend climbing up. It is very steep.
The wall is smooth. You don’t have to count on help in this remote area if something happens to you. Besides, it is an extremely delicate rock formation, still damaged by wind, sand, water, and frost. By climbing a rock, you also contribute to its devastation. Let us preserve this extraordinary miracle of nature for future generations.
Desert Hiking Safety Tips for visiting Rattlesnake Arches
Rattlesnake Arches is a wilderness area so prepare for this hike. You’re on your own in this high desert. Although it is marked pretty well, it’s easy to lose. It’s not a crowded place. During all day, we met a few people. Check our tips.
- Before your trip, check the weather. Don’t go via Black Ridge Access Road if it’s rain or snow. If it’s extremely hot, consider camping in the area to start the hike just after sunrise.
- Most of all, bring a lot of water. A gallon per person is a minimum. We did this hike in April, and it was scorching. We were exhausted because of the sun at the end of the trek. So seriously, hydrate yourself before that hike. Pack a lot of water. A large water reservoir and a water bottle per person should be ok. Take some sports drinks with electrolytes, especially during Summer.
- But also pack more water into your car. Driving back from the trail will be more challenging because you will be tired after the hike. So again, drink a lot of water before your drive to focus on the rocky and tough road.
- Pack a paper map and guide or GPS, or take a good GPS watch. There is no telephone coverage in this area. So, a good navigation device will be of great help.

- Wear hiking shoes with good soles. The ground is rocky. There are also some bushes. It is worth having a well-protected foot and ankle.
- Wear clothes that will protect you from the sun. Remember the hat on the head and the long sleeves. Long-sleeved light clothes protect you from sunburn. In addition, it protects you from rubbing against rocks or scratching bushes and against insect bites in this desert area. After all, it’s Rattlesnake Canyon, so snakes or lizards can be hidden in rocks or grass. Therefore, before you sit somewhere, check whether the area is safe. Pack sunscreen, and don’t forget to apply it.
- Watch your body and listen to it. Even experienced hikers have weaker days. Rest in the shade if you feel tired. Remember to drink often, but only a few sips of water.
- Trekking poles on this hike will also be very useful. They relieve your spine and joints and make your trek easier. Check out our article on the benefits of trekking poles.
- It’s an intense, energy-aggressive adventure, so pack more hiking food. High-protein snacks come in handy. This trail does not seem long. An experienced wanderer will tell you that it is only a few miles. We are also experienced and spent much more time in this place than we assumed. First of all, these Rattlesnakes Arches are delightful. And because the access was difficult, we wanted to stay in this place as long as possible. We wanted to take pictures and feast our eyes on these wonders of nature. Secondly, it was hot, so we rested in a small amount of shade by the rocks several times.
- Biting gnats are prevalent May-August, so take some repellent with DEET.
- Also, pack a first aid kit. A warmer jacket will be handy because it gets cold quickly after sunset.
- Take a headlamp in case you come back after dark.
Camping in the Rattlesnake Canyon Arches area
It is possible to spend the night and camp in this amazing area. But Camping is NOT permitted within 1/4 mile of the Rattlesnake Arches Loop and along the access road to the trailhead. The parking at the trailhead and trail is for day use only. Do not camp there. Check the rules on the BLM website.
If you want to stay in Fruita or Grand Junction, check our guide to Colorado National Monument.